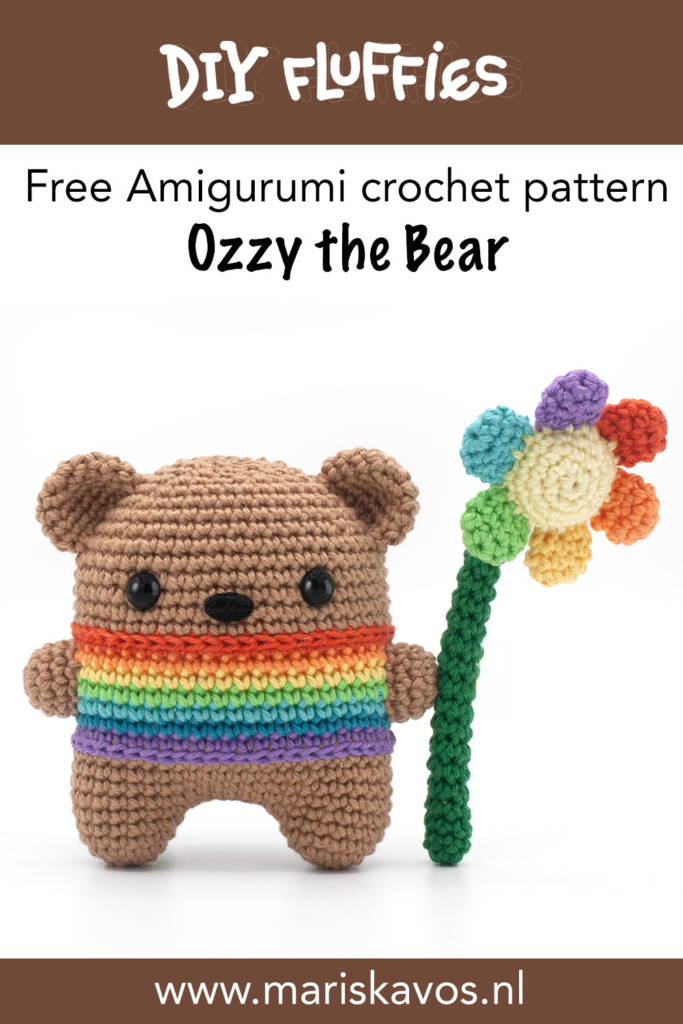
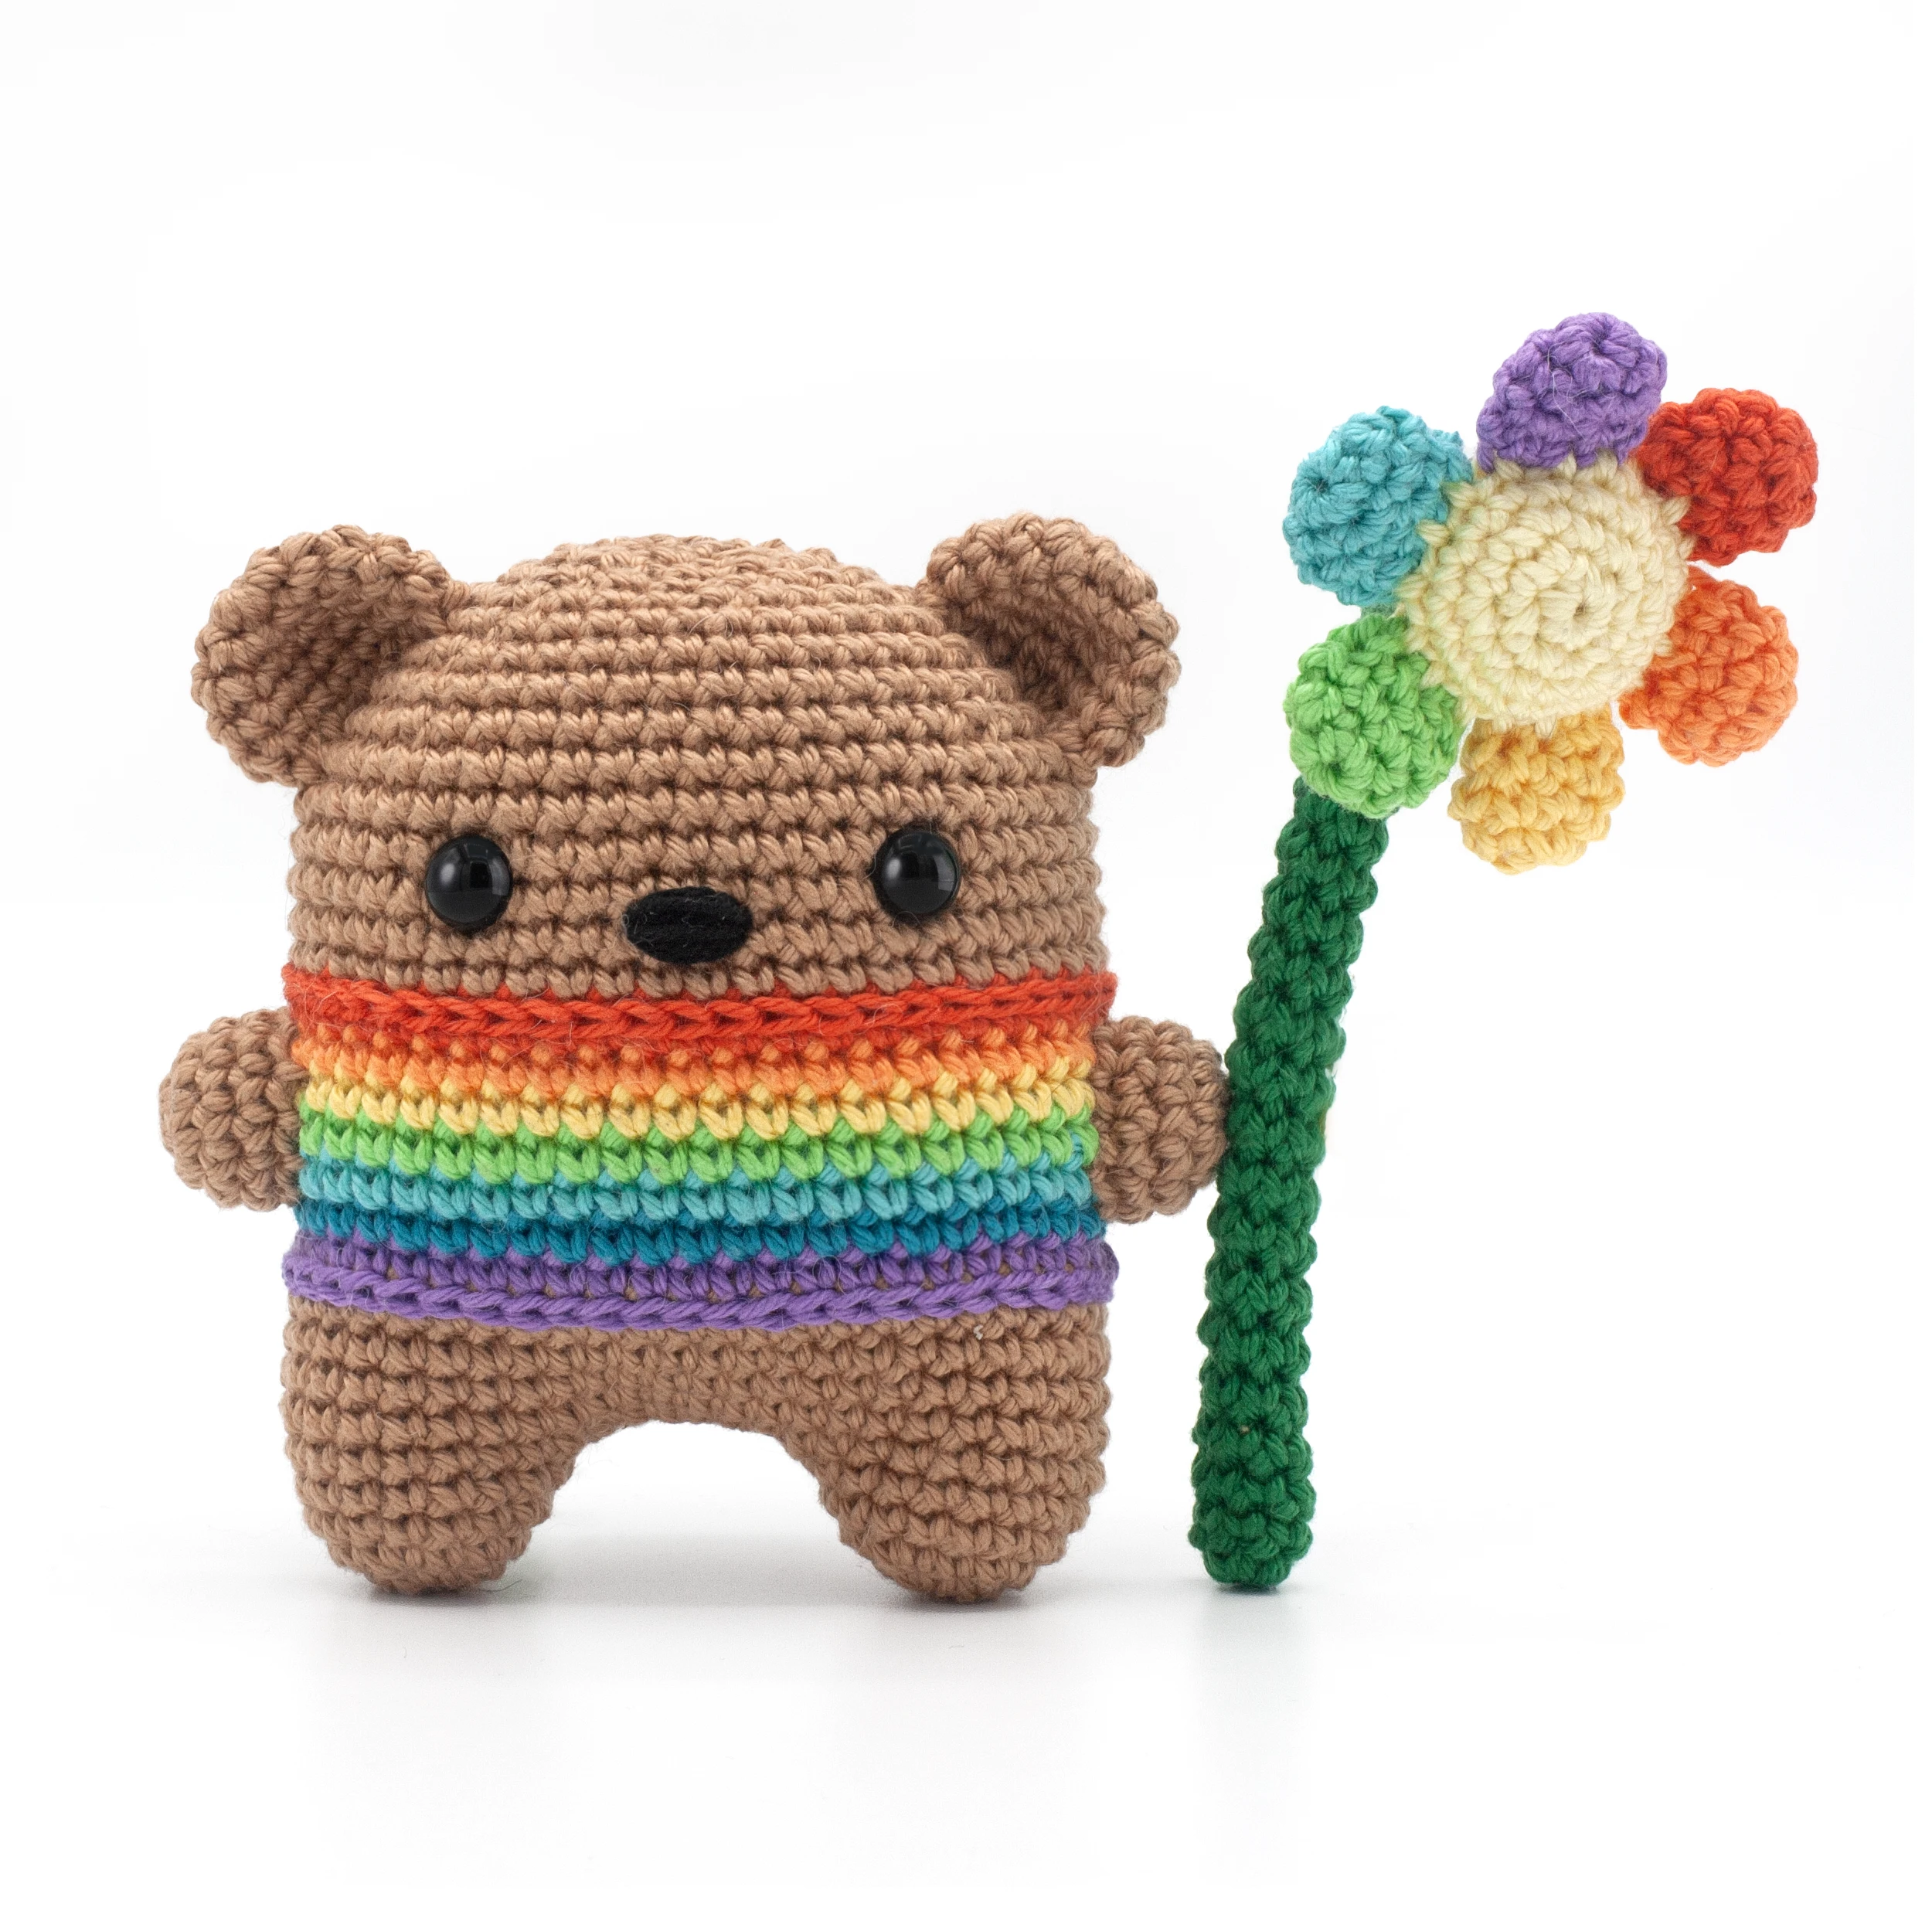
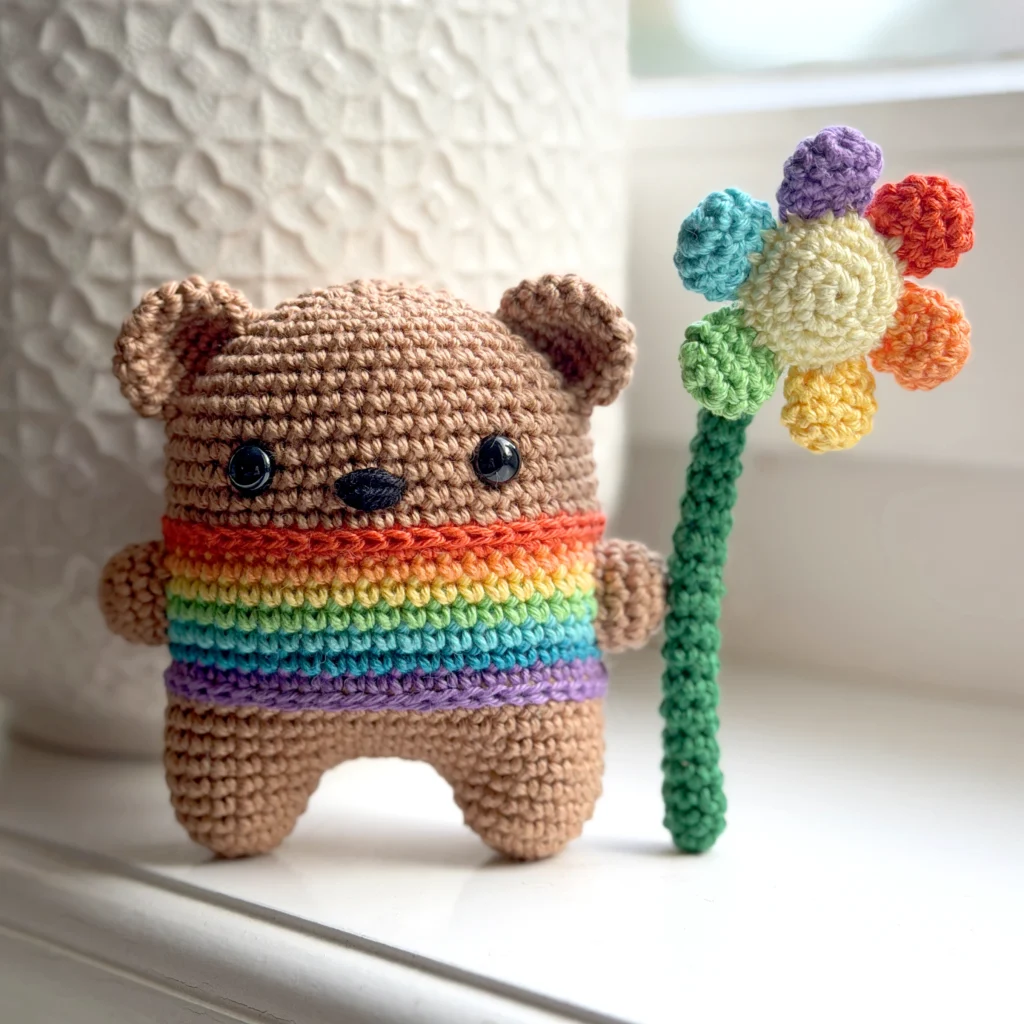
Free Ozzy the Bear Crochet Pattern
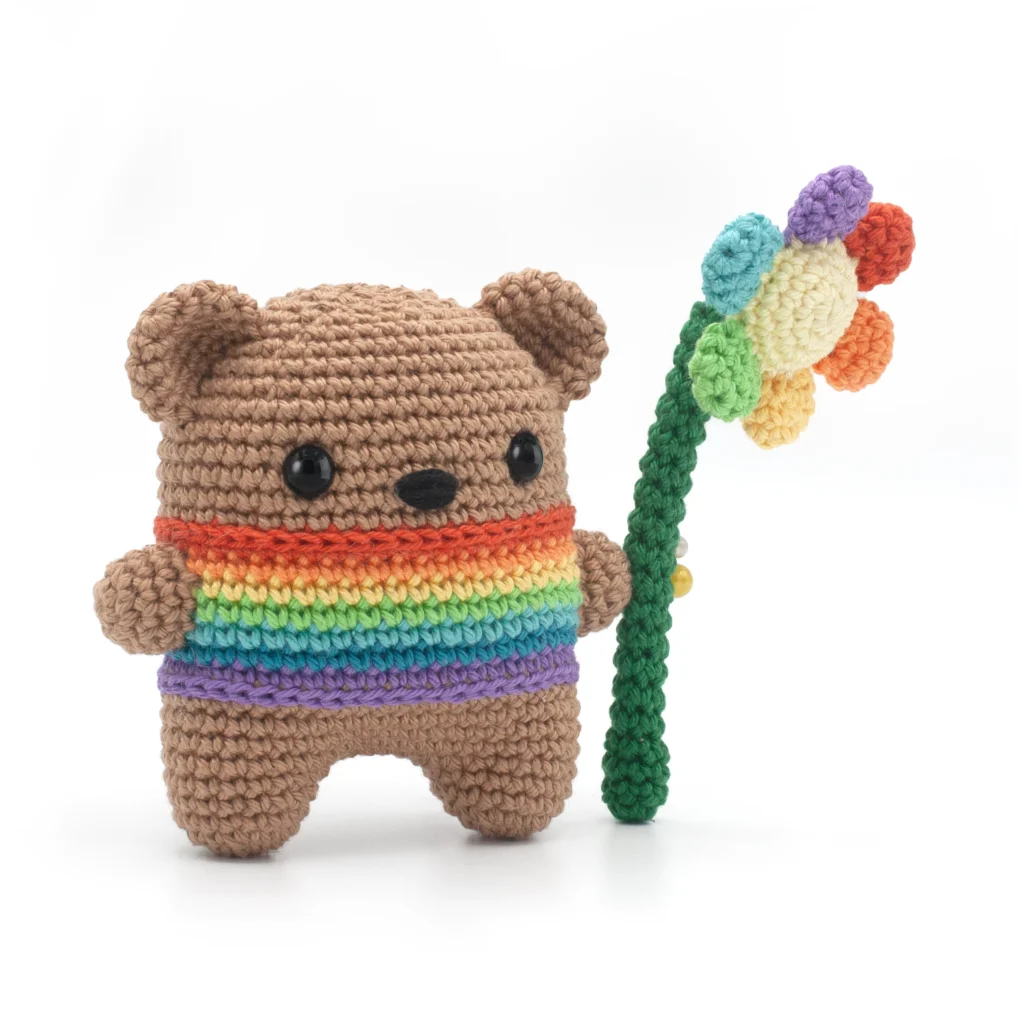
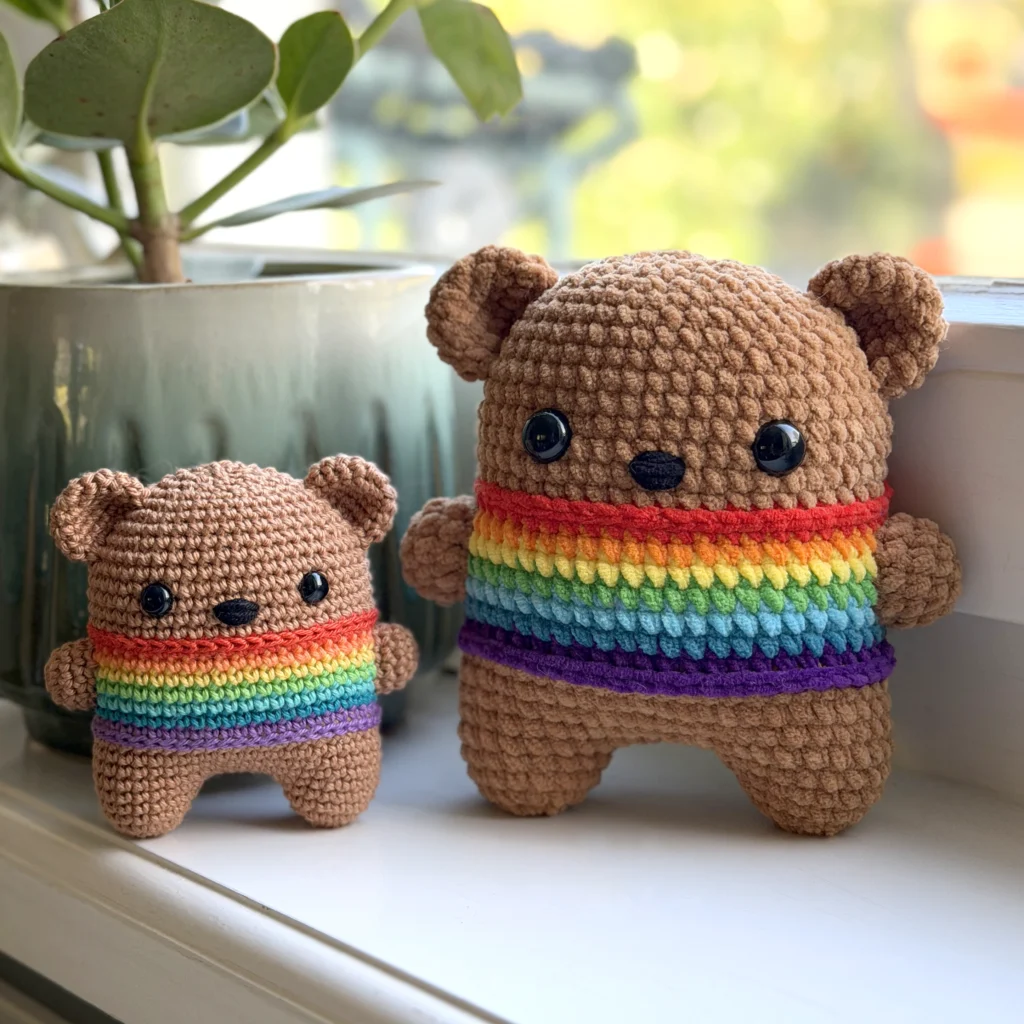
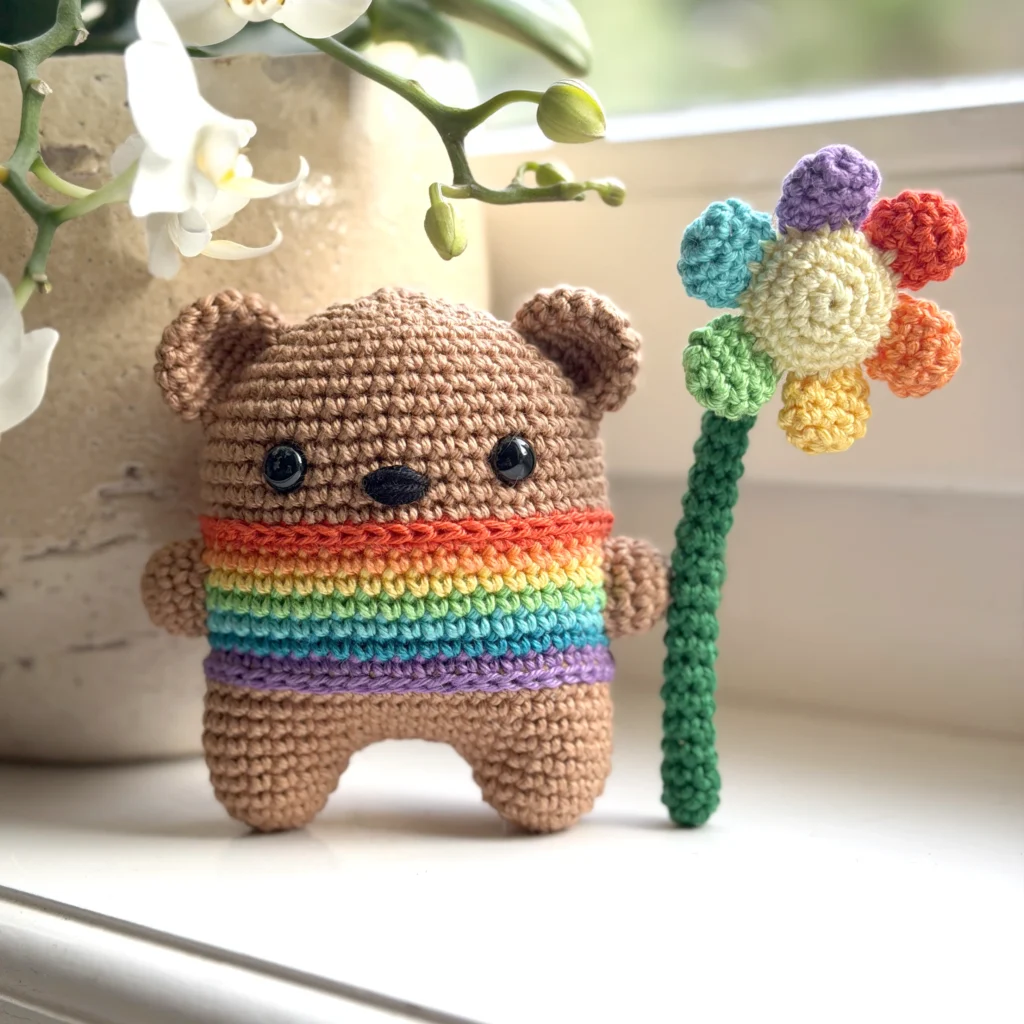
This free bear crochet pattern lets you create Ozzy the Bear, a tiny amigurumi bear wearing a colorful rainbow shirt and holding a big, cheerful flower. Ozzy can be made with any yarn you like, but when crocheted with sport-weight cotton yarn and a B/1 (2.5 mm) crochet hook, he becomes an adorable 4-inch (10 cm) mini plush.
This easy beginner amigurumi pattern uses simple stitches, works up quickly, and is written in U.S. terms, making it accessible for crocheters of all skill levels. It’s perfect for anyone who loves making small crochet animals, cute amigurumi characters, or quick stash-busting projects.
Whether you’re new to amigurumi or looking for a fun, colorful design, Ozzy the Bear is a joyful little friend to add to your collection.
Story:
Ozzy the Bear loves wearing his rainbow‑striped shirt. The bright, happy colors make him feel brave and just a little bit magical. He carries a big flower everywhere he goes, letting it sway gently as he strolls through the meadow. With every step, his rainbow shirt glimmers in the sunlight, turning ordinary moments into tiny celebrations. And no matter where he wanders, Ozzy’s cheerful flower always brings a smile to everyone he meets.
PDF Pattern Ozzy the Bear
PDF Pattern without ads:
If you prefer a pdf download or want to support me, you can buy the pdf pattern in my etsy shop, thank you so much for your support! (Keep scrolling for the free pattern)
Basic Stitches Tutorial
If you are a beginner that want to learn how to crochet, check out my beginner-friendly basic stitches tutorial, it has many instructional videos on how to crochet every stitch. It shows you all you need to know to make your very own cute Ozzy the Bear Amigurumi with this free bear crochet pattern.
Materials
These are the materials that I used. However, feel free to replace them with other materials of your choice. Furthermore, if you wish to crochet a larger or smaller version of the bear amigurumi using this free stuffed animal crochet pattern, you can simply use a thicker or thinner yarn and crochet hook.
Cotton Sport Weight version 4 inch / 10 cm:
– Brown Yarn and Colors Must Have color: 127
– Red Yarn and Colors Must Have color: 022
– Orange Yarn and Colors Must Have color: 017
– Yellow Yarn and Colors Must Have color: 014
– Light Yellow Yarn and Colors Must Have color: 010
– Green Yarn and Colors Must Have color: 082
– Dark Green Yarn and Colors Must Have color: 087
– Light Blue Yarn and Colors Must Have color: 120
– Dark Blue Yarn and Colors Must Have color: 070
– Purple Yarn and Colors Must Have color: 053
– Black Yarn and Colors Must Have color: 100
– Synthetic Poly Filling
– Crochet hook size B/1 (2.5 mm)
– Safety eyes 10 mm
Search for a similar cotton yarn you can buy near you on YARNSUB
Chenille Bulky version 6 inch / 14 cm:
– Brown Scheepjes Little Darling color: 404
– Red Scheepjes Little Darling color: 417
– Orange Scheepjes Little Darling color: 403
– Yellow Scheepjes Little Darling color: 402
– Green Scheepjes Little Darling color: 407
– Dark Green Scheepjes Little Darling color: 419
– Light Blue Scheepjes Little Darling color: 425
– Dark Blue Scheepjes Little Darling color: 414
– Purple Scheepjes Little Darling color: 422
– Black Scheepjes Little Darling color: 410
– Synthetic Poly Filling
– Crochet hook size G/6 (4.0 mm)
– Safety eyes 15 mm
Supplies:
– Scissors
– Tapestry needles with blunt point, nr. 16 or 17
– Pins
TIP: Are you using are using Blanket yarn? Then I recommend a L/11 (8.0 mm) crochet hook.
For Super Bulky Chenille yarn I recommend a H/8 (5.0 mm) crochet hook.
Abbreviations
Abbreviations (U.S. Terms) used in this free cute bear crochet pattern:
(All abbreviations are explained in my basic stitches tutorial)
Rnd: Round
st: stitch
sc: single crochet
sl st: slip stitch
hdc: half double crochet
dc: double crochet
Free Ozzy the Bear Crochet Pattern
Body:
- Begin in Brown yarn
- First make two legs
Legs 2x:
- Rnd 1: start 6 sc in a magic ring (6)
- Rnd 2: inc in all 6 st (12)
- Rnd 3: (sc in next st, inc in next st) repeat 6 times (18)
- Rnd 4: sc in all 18 st (18)
- Fasten one leg off with a slip stitch, do not fasten off the other leg.
Body:
- Continue to crochet in the second leg.
- Rnd 5: sc in the next 9 sc, ch 6, (now we are going to join with another leg) continue in the first stitch of the first leg, in all 18 st of Leg 1, sc in the 6 ch, continue in the tenth stitch of the second leg, sc in next 9 st (48)
- Rnd 6-10: sc in all 48 st (48)
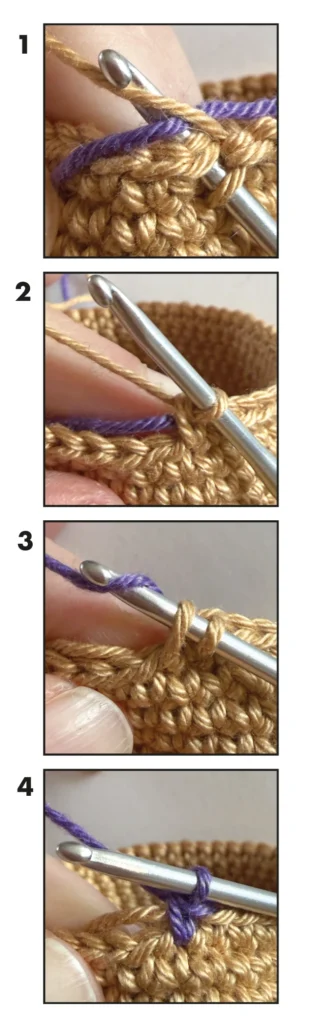
- In the next round we are going to change colors, click here for a detail tutorial with video on my blog.
- Change to purple yarn (photo 1-4)
- Rnd 11: sc in all 48 st (48)
- Change to dark blue yarn
- Rnd 12: sc in all 48 st (48)
- Change to light blue yarn
- Rnd 13: sc in all 48 st (48)
- Change to green yarn
- Rnd 14: sc in all 48 st (48)
- Change to yellow yarn
- Rnd 15: sc in all 48 st (48)
- Change to orange yarn
- Rnd 16: sc in all 48 st (48)
- Change to red yarn
- Rnd 17: sc in all 48 st (48)
- Change to brown yarn
- Mark the 10th and 20th stitch of round 20 with a piece of leftover yarn or a stitch marker.
- Rnd 18-22: sc in all 48 st (48)
- Rnd 23: sc in next 45 st, dec, sc in next st (47)
- Rnd 24: sc in in next 2 st, dec, sc in next 3 st, dec, sc in next 12, dec, sc in next 3 st, dec, sc in next 3 st, dec, sc in next 14 (42)
- Rnd 25: sc in next 39 st, dec, sc in next st (41)
- Rnd 26: sc in next st, dec, sc in next 2 st, dec, sc in next 12 st, dec, sc in next 2 st, dec, sc in next 2 st, dec, sc in next 9 st, dec, sc in next 1 sc (35)
- Rnd 27: dec, sc in next st, dec, sc in next 11 st, dec, sc in next st, dec, sc in next st, dec, sc in next 11 st (30)
- Attach the safety eyes between rounds 20 and 21, in the stitches marked earlier. This is the placement I used, placement may be a bit more to the left or right if you are using different yarn or are left handed. I always put some fiber filling in the body to shape the bear, so I can see if they are placed correctly before attaching the washer.
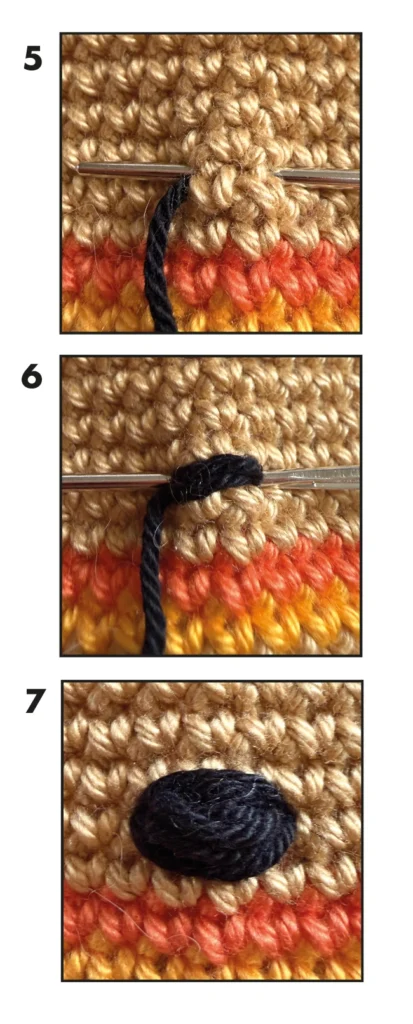
- Embroider a nose between rounds 19 and 20, the nose is 3 stitches wide (photo 5-7).
- Rnd 28: (sc in next 3 st, dec) repeat 6 times (24)
- Rnd 29: (sc in next 2 st, dec) repeat 6 times (18)
- Stuff the body with fiber filling and continue stuffing as you go.
- Rnd 30: (sc, dec) repeat 6 times (12)
- Rnd 31: dec 6 times (6)
- Fasten off, leaving a long yarn tail.
- Finish the body by taking the last strand of yarn and sewing it through the front loops of every crochet stitch that you made in the last round. Pull the yarn tight to close the hole. Now stick a needle under the hole and weave in the yarn end.
Ear 2x:
- Use brown yarn
- Rnd 1: start 6 sc in a magic ring (6)
- Rnd 2: inc in all 6 st (12)
- Rnd 3: (sc in next 2 st, inc in next st) repeat 4 times (16)
- Rnd 4-5: sc in all 16 st (16)
- Fasten off with a slst, leaving a yarn tail.
- Flatten the ears and bend them a bit and sew them between rounds 22 and 28 on the side of the head.
Arm 2x:
- Use brown yarn
- Rnd 1: start 6 sc in a magic ring (6)
- Rnd 2: inc in all 6 st (12)
- Rnd 3-4: sc in all 12 st (12)
- Fasten off with a slst, leaving a yarn tail.
- Put a bit of fiber filling in the arms. Sew the arms between rounds 12 and 17.
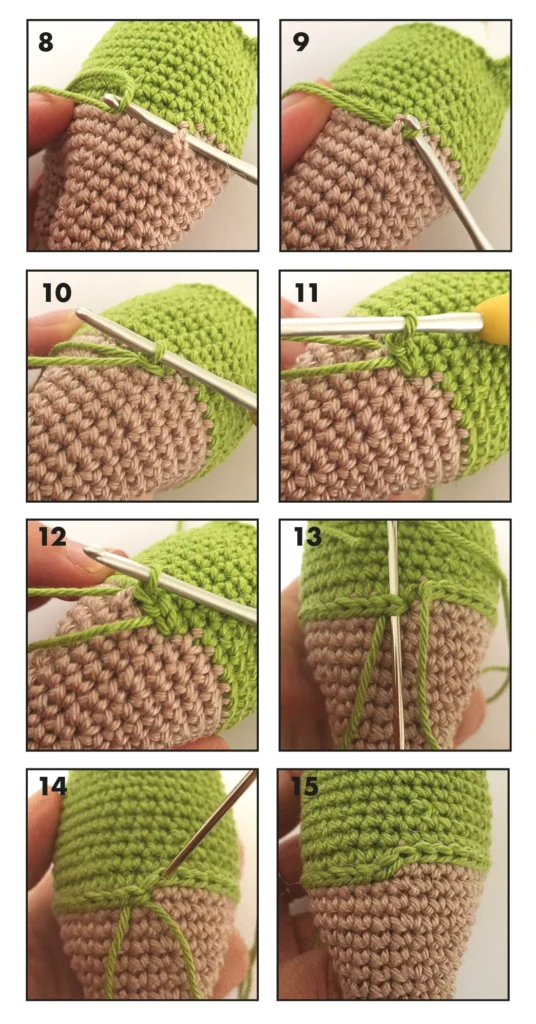
- Crochet a purple border between the brown and purple rounds, and a red border between the red and brown rounds with surface slip stitches.
- You can find a detail video tutorial about how to surface crochet here.
- Insert the hook under the first stitch, grab the yarn and draw up a loop. Yarn over and draw through the loop on the hook attaching the yarn to the body. Insert the hook under the next stitch.Yarn over and draw the yarn under the stitch and through the loop on the hook (like a slip stitch). Do this in all the stitches. The photo’s below show you how to surface crochet on your bear, these are photo’s from another pattern, but the technique is the same.
Tail:
- Use brown yarn
- Rnd 1: start 6 sc in a magic ring (6)
- Fasten off with a slst, leaving a yarn tail.
- Sew the tail on the back of the body, just below the purple round.
Flower:
Petal 6x:
- Make 6 petals in different colors: red, orange, yellow, green, blue and purple
- Rnd 1: start 6 sc in a magic ring (6)
- Rnd 2: (sc in next st, inc in next st) repeat 3 times (9)
- Rnd 3: sc in all 9 st (9)
- Rnd 4: (sc, dec in next st) repeat 3 times (6)
- Fasten off with a slst.
Flower middle:
- Use light yellow yarn
- Rnd 1: start 6 sc in a magic ring (6)
- Rnd 2: inc in all 6 st (12)
- Rnd 3: (sc in next st, inc in next st) repeat 6 times (18)
- Rnd 4: sc in all 18 st (18)
- In round 9 we are going to attach the petals to the flower middle.
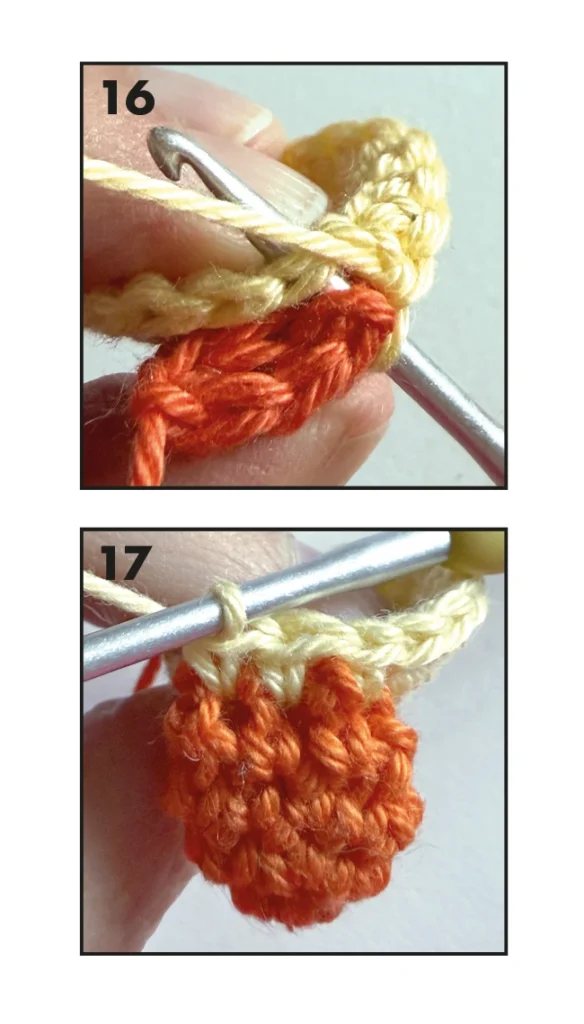
- Rnd 5: (Going through the flattened petal stitches and round 4: sc in the next 3 st) repeat 6 times (18) photo 16 & 17
- Rnd 6: sc in all 18 st (18)
- Rnd 7: (sc, dec in next st) repeat 6 times (12)
- Stuff the flower middle with fiber filling.
- Rnd 8: dec 6 times (6)
- Fasten off, leaving a yarn tail.
- Finish the flower middle by taking the last strand of yarn and sewing it through the front loops of every crochet stitch that you made in the last round. Pull the yarn tight to close the hole. Now stick a needle under the hole and weave in the yarn end.
Flower Stem:
- Use dark green yarn
- Rnd 1: start 6 sc in a magic ring (6)
- Rnd 2-19: sc in all 6 st (6)
- Fasten off, leaving a yarn tail.
- Finish the stem by taking the last strand of yarn and sewing it through the front loops of every crochet stitch that you made in the last round. Pull the yarn tight to close the hole. Leave a long yarn tail.
- To keep the stem straight up put a straw or piece of thick bendable craft wire inside the stem.
- Sew the top of the stem on the back of the flower.
Now your little bear is done! I hope you enjoyed this colorful crochet pattern. There are many more cute Amigurumi patterns on my blog.