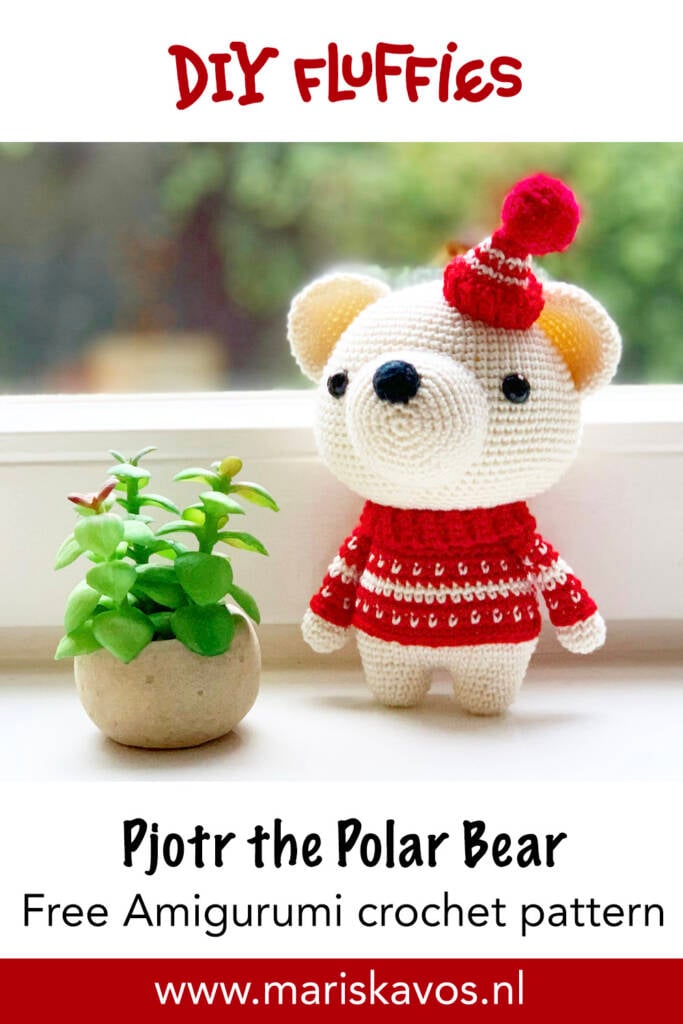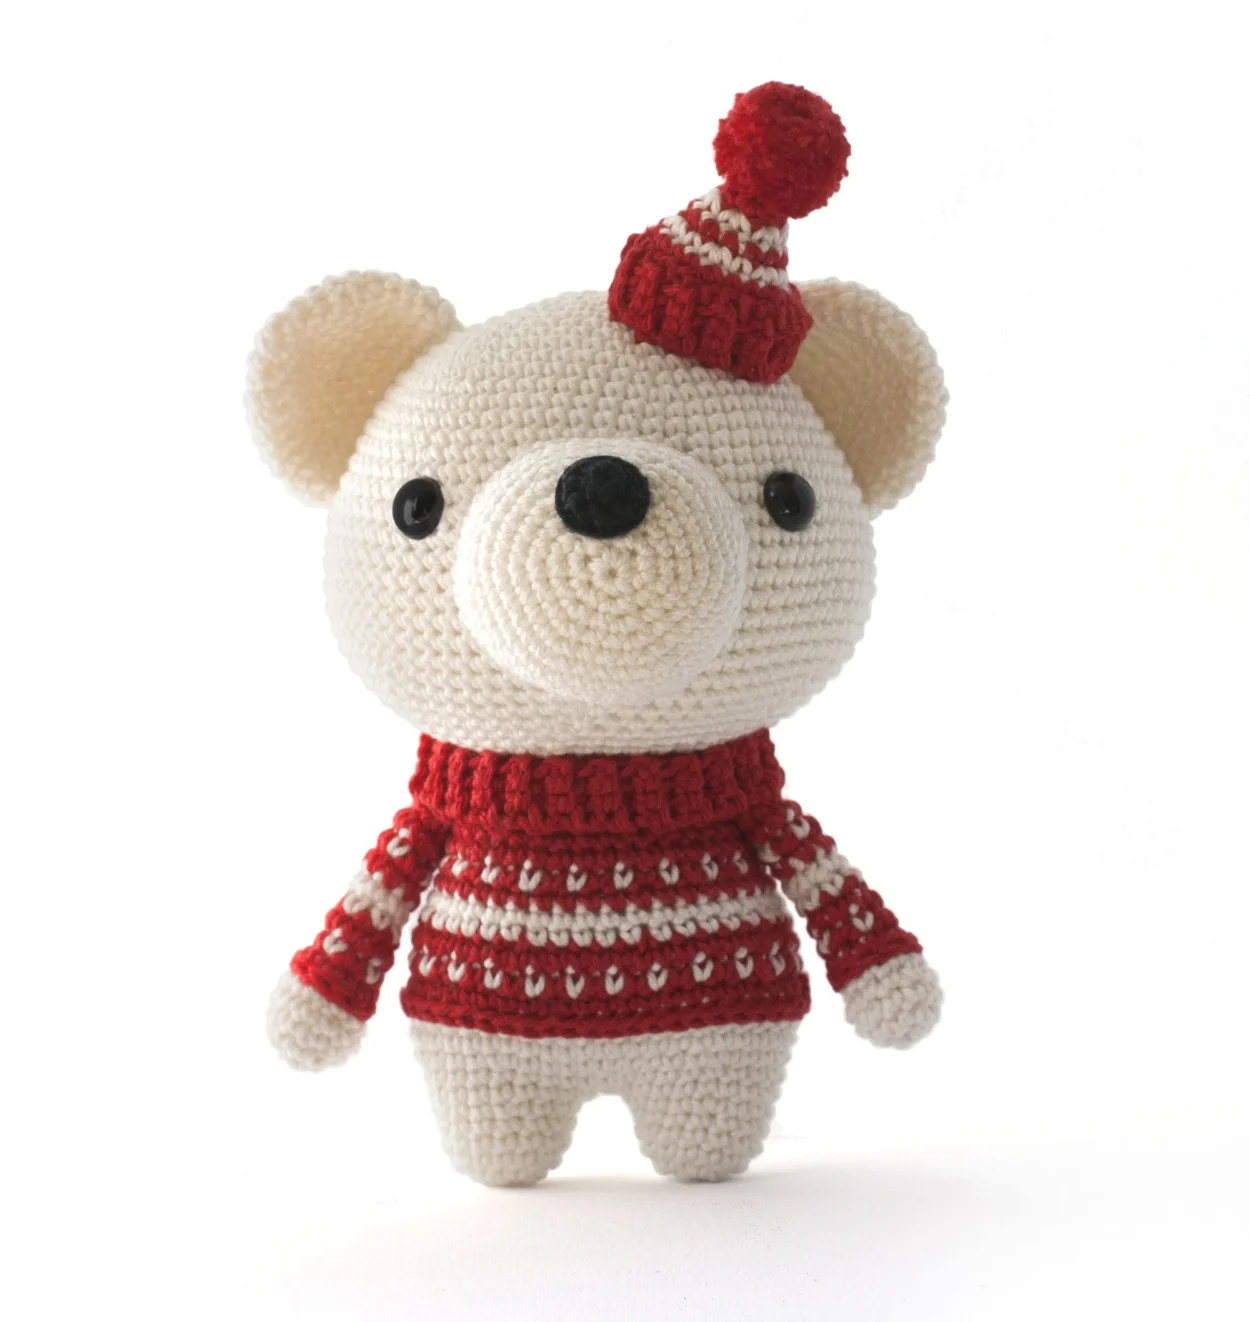
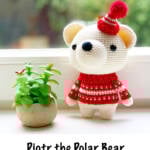
Pjotr the Polar Bear Amigurumi
Crochet Pjotr the Polar Bear winter Amigurumi with this easy free polar Bear crochet pattern, a very cute gift for christmas. This adorable pattern was first published in my etsy shop and is now available for free on my DIY Fluffies blog.
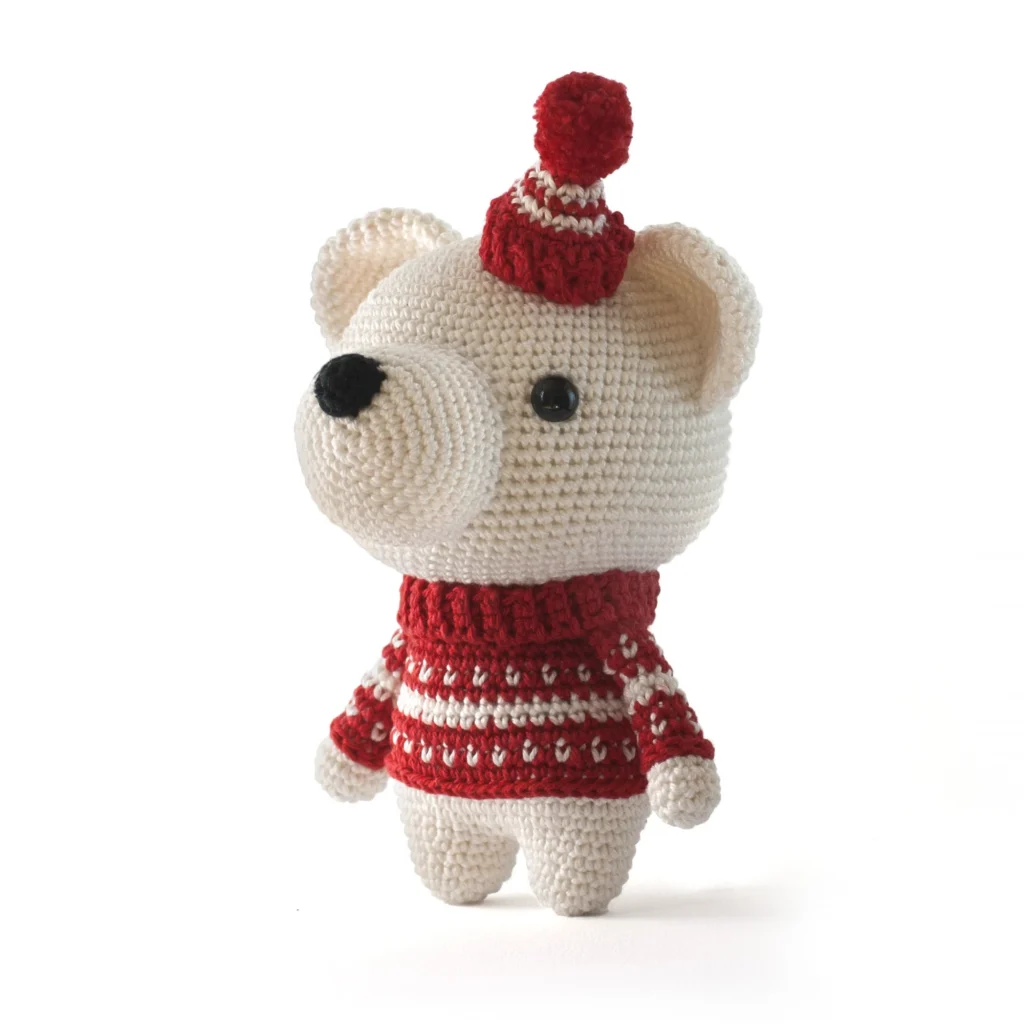
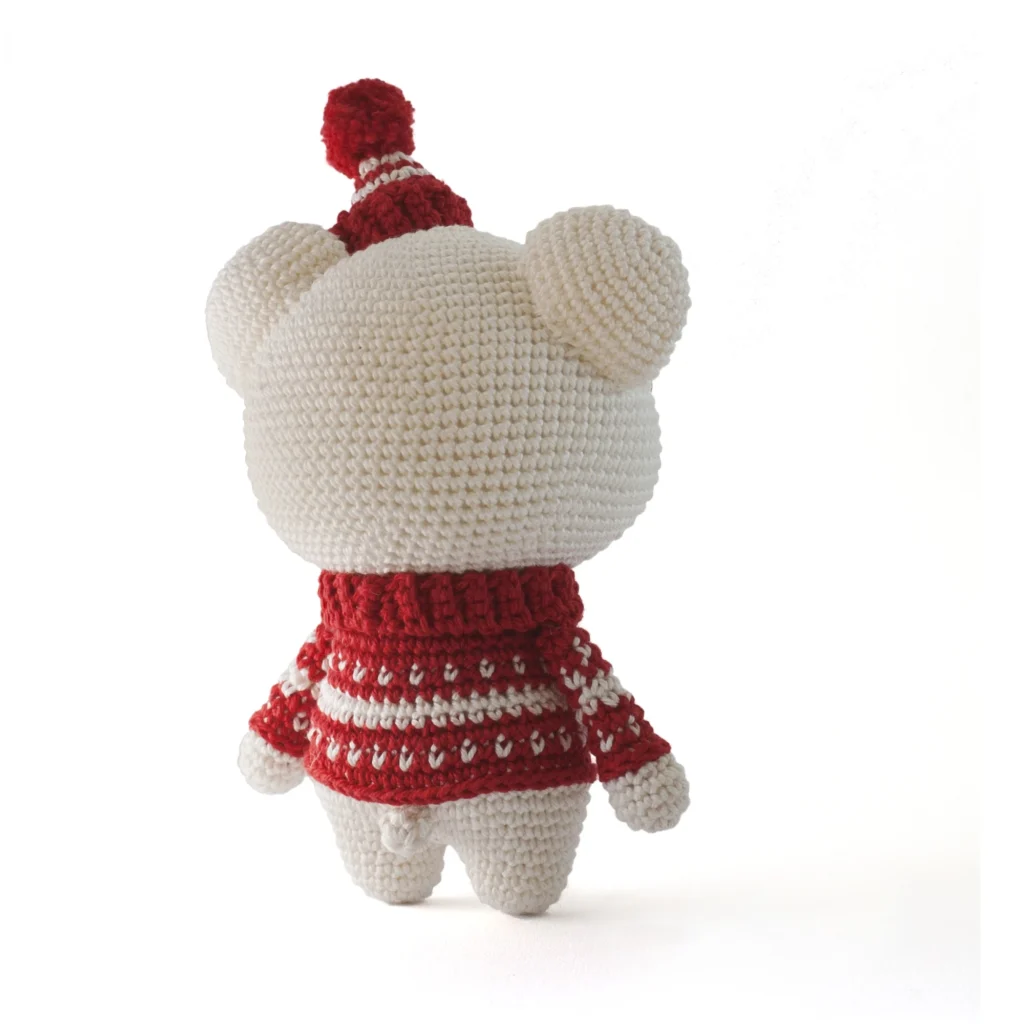
The polar bear in the photo was made with sport-weight cotton yarn and a B/1 (2.5 mm) hook. If you use the same yarn, your polar bear will be 7 inches (18 cm) tall. Use thicker yarn if you want to create a bigger polar bear.
Table of contents
A little Story about Pjotr the Polar Bear:
Pjotr the Polar Bear loved winter more than anything. Dressed in his cozy red sweater and matching hat, he waddled through the snow, leaving tiny paw prints behind. Each morning, he built a snowbear friend to share cocoa with. When the northern lights danced above, Pjotr would whisper his wishes to the sky, for endless snow, warm hugs, and just one more winter adventure.
PDF Pattern Polar Bear Crochet
PDF Pattern without ads:
If you prefer a pdf download or want to support me, you can buy the pdf pattern in my etsy shop, thank you so much for your support! (Keep scrolling for the free pattern)
Basic Stitches Tutorial
If you are a beginner that want to learn how to crochet, check out my beginner-friendly basic stitches tutorial, it has many instructional videos on how to crochet every stitch. It shows you all you need to know to make your very own cute Amigurumi with this free polar bear crochet pattern.
Materials
These are the materials that I used. However, feel free to replace them with other materials of your choice. Furthermore, if you wish to crochet a larger or smaller version of the Pjotr the Polar Bear amigurumi using this free stuffed animal crochet pattern, you can simply use a thicker or thinner yarn and crochet hook.
Cotton Sport Weight version 15 cm / 6 inch:
– Red Yarn and Colors Must Have color: 032
– Black Yarn and Colors Must Have color: 100
– White Yarn and Colors Must Have color: 001
– Synthetic Poly Filling
– Crochet hook size B/1 (2.5 mm)
– Safety eyes 10 mm
Search for a similar cotton yarn you can buy near you on YARNSUB
Supplies:
– Scissors
– Tapestry needles with blunt point, nr. 16 or 17
– Pins
TIP: Are you using are using Blanket yarn? Then I recommend a L/11 (8.0 mm) crochet hook.
For Super Bulky Chenille yarn I recommend a H/8 (5.0 mm) crochet hook, for bulky velvet yarn a E/4 (3.5 mm) crochet hook.

Abbreviations
Abbreviations (U.S. Terms) used in this free polar bear crochet pattern:
(All abbreviations are explained in my basic stitches tutorial)
Rnd: Round
st: stitch
sc: single crochet
sl st: slip stitch
dec: decrease
inc: increase
Free Polar Bear Crochet Pattern
Head
- Use white yarn
- Rnd 1: start 6 sc in a magic ring (6)
- Rnd 2: inc in all 6 st (12)
- Rnd 3: (sc in next st, inc in next st) repeat 6 times (18)
- Rnd 4: (sc in next 2 st, inc in next st) repeat 6 times (24)
- Rnd 5: (sc in next 3 st, inc in next st) repeat 6 times (30)
- Rnd 6: (sc in next 4 st, inc in next st) repeat 6 times (36)
- Rnd 7: (sc in next 5 st, inc in next st) repeat 6 times (42)
- Rnd 8: (sc in next 6 st, inc in next st) repeat 6 times (48)
- Rnd 9: (sc in next 7 st, inc in next st) repeat 6 times (54)
- Rnd 10: sc in all 54 st (54)
- Rnd 11: (sc in next 8 st, inc in next st) repeat 6 times (60)
- Rnd 12-14: sc in all 60 st (60)
- Rnd 15: (sc in next 9 st, inc in next st) repeat 6 times (66)
- Rnd 16: sc in all 66 st (66)
- Rnd 17: (sc in next 10 st, inc in next st) repeat 6 times (72)
- Rnd 18-25: sc in all 72 st (72)
- Insert both safety eyes between rounds 17 and 18, with an interspace of 16 stitches.
- Watch my video on how to attach safety eyes easily: https://youtu.be/-eggN6savXE
A very helpfull video for this free polar bear crochet pattern, but also for all your other Amigurumi. - Rnd 26: (sc in next 10 st, dec) repeat 6 times (66)
- Rnd 27: (sc in next 9 st, dec) repeat 6 times (60)
- Rnd 28: (sc in next 8 st, dec) repeat 6 times (54)
- Rnd 29: (sc in next 7 st, dec) repeat 6 times (48)
- Rnd 30: (sc in next 6 st, dec) repeat 6 times (42)
- Rnd 31: (sc in next 5 st, dec) repeat 6 times (36)
- Rnd 32: (sc in next 4 st, dec) repeat 6 times (30)
- Rnd 33: (sc in next 3 st, dec) repeat 6 times (24)
- Rnd 34: (sc in next 2 st, dec) repeat 6 times (18)
- Stuff the head with filling.
- Rnd 35: (sc in next st, dec in next st) repeat 6 times (12)
- Rnd 36: dec 6 times (6)
- Finish the head by taking the last strand of yarn and sewing it through the front loops of every crochet stitch that you made in the last round. Pull the yarn tight to close the hole. Now stick a needle under the hole and weave in the yarn end.
Nose:
- Use black yarn
- Rnd 1: start 8 sc in a magic ring (8)
- Rnd 2: sc in all 8 st (8)
- Fasten off with a slip stitch, leave a long piece of yarn to sew the nose on the snout.
Snout:
- Use white yarn
- Rnd 1: start 6 sc in a magic ring (6)
- Rnd 2: inc 6 times (12)
- Rnd 3: (sc, inc in next st) repeat 6 times (18)
- Rnd 4: (sc in next 2 st, inc in next st) repeat 6 times (24)
- Rnd 5: (sc in next 3 st, inc in next st) repeat 6 times (30)
- Rnd 6: (sc in next 4 st, inc in next st) repeat 6 times (36)
- Rnd 7-11: sc in all 36 st (36)
- Fasten off with a slip stitch, leave a long piece of yarn to sew the snout on the head. Sew the snout on the head on rounds 15-26. Stop sewing when you have a hole left to stuff the snout. Stuff the snout and sew the nose on the snout, on rounds 3-6. Hide the thread in the snout. Finish sewing the snout on the head.
Ears 2x:
- Use white yarn
- Rnd 1: start 6 sc in a magic ring (6)
- Rnd 2: inc 6 times (12)
- Rnd 3: (sc, inc in next st) repeat 6 times (18)
- Rnd 4: (sc in next 2 st, inc in next st) repeat 6 times (24)
- Rnd 5-6: sc in all 24 st (24)
- Rnd 7: (sc in next 3 st, inc in next st) repeat 6 times (30)
- Rnd 8-10: sc in all 30 st (30)
- Fasten off with a slip stitch, leave a long piece of yarn to sew the ears onto the head. Flatten the ears. Sew the ears on the side of the head, on rounds 8-18.
Body:
- First make two legs:
- Legs 2x:
- Use white yarn
- Rnd 1: start 8 sc in a magic ring (8)
- Rnd 2: inc 8 times (16)
- Rnd 3-5: sc in all 16 st (16)
- Rnd 6: (sc in next 3 st, inc in next st) repeat 4 times (20)
- Fasten one leg off with a slip stitch, do not fasten off the other leg.
Body:
When making the body, you need to change colors (see photo’s below), you can find a detailed tutorial on how to color change here: https://www.mariskavos.nl/how-to-color-change-in-amigurumi/
A great help for your free polar bear crochet pattern.

- Continue to crochet in the second leg.
- Watch my video tutorial if you need help crocheting the legs together.
- Rnd 1: sc in the next 10 sc, (now we are going to join with another leg) continue in the first stitch of the first leg, in all 20 st of Leg 1 continue in the eleventh stitch of the second leg, sc in next 10 st (40)
- Rnd 2: sc in all 40 st (40)
- Rnd 3: (sc in next 4 st, inc in next st) repeat 8 times (48)
- Rnd 4-5: sc in all 48 st (48)
- Change color to red
- Rnd 6: sc in all 48 st (48)
- Rnd 7: (sc in next st, change color to white, sc in next st, change color to red) repeat 24 times (48)
- Rnd 8: sc in all 48 st (48)
- Change color to white
- Rnd 9: (sc in next 4 st, dec) repeat 8 times (40)
- Rnd 10: sc in all 40 st (40)
- Change color to red
- Rnd 11: sc in all 40 st (40)
- Rnd 12: (change color to white, sc in next st, change color to red, sc in next st) repeat 20 times (40)
- Rnd 13-14: sc in all 40 st (40)
- Rnd 15: (sc in next 3 st, dec) repeat 8 times (32)
- Rnd 16: sc in all 32 st (32)
- Fasten off with a slip stitch, leave a long piece of yarn to sew the body on the head.
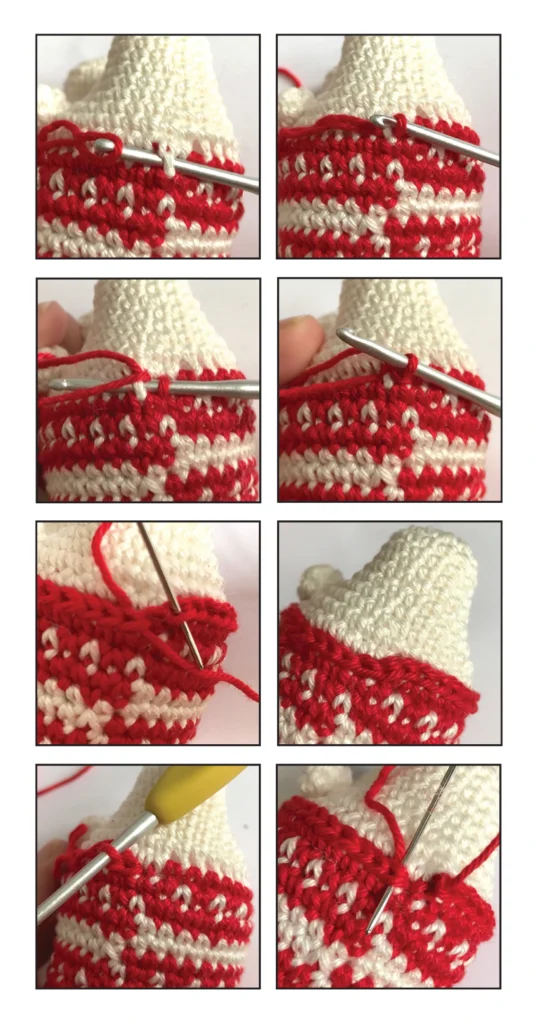
- Now crochet a border between the white and red rounds. This technique is called Surface Crochet (you can find a video tutorial here):
A great help for this free polar bear crochet pattern - Insert the hook under the first stitch, grab the yarn and draw up a loop. Yarn over and draw through the loop on the hook attaching the yarn to the body. Insert the hook under the next stitch.Yarn over and draw the yarn under the stitch and through the loop on the hook (like a slip stitch). Do this in all the stitches.
- Stuff the body with filling. Sew the body onto the head, between round 32-33.
Arm 2x:
- Use white yarn
- Rnd 1: start 6 sc in a magic ring (6)
- Rnd 2: inc 6 times (12)
- Rnd 3-4: sc in all 12 st (12)
- Rnd 5: (sc in next 2 st, dec) repeat 3 times (9)
- Change color to red
- Stuff the arms with filling.
- Rnd 6: sc in all 9 st (9)
- Rnd 7: (sc in next st, change color to white, sc in next st, change color to red) repeat 4 times , sc in next st (9)
- Rnd 8: sc in all 9 st (9)
- Change color to white
- Rnd 9: sc in next 2 st, dec, sc in next 3 st, dec (7)
- Rnd 10: sc in all 7 st (7)
- Change color to red
- Rnd 11: sc in all 7 st (7)
- Rnd 12: (sc in next st, change color to white, sc in next st, change color to red) repeat 3 times , sc in next st (7)
- Rnd 13: sc in all 7 st (7)
- Put a bit more stuffing into the arms.
- Fasten off with a slip stitch, leave a long piece of yarn to sew the arms on the body.
- Now crochet a border between the white and red rounds.
- Sew the arms on the sides of the body on round 14.
Collar:
- Use red yarn, crochet in rows
- Start making a chain
- Ch 4
- Row 1: Start in second ch from hook, BLO sc in next 3 st, ch 1, turn (3)
- Row 2-42: BLO sc in next 3 st, ch 1, turn (3)
- Fasten off.
- Wrap the collar around the neck and sew the ends together.
Hat:
- Hat top:
- Use red yarn
- Rnd 1: start 6 sc in a magic ring (6)
- Rnd 2: sc in all 6 st (6)
- Change color to white
- Rnd 3: inc 6 times (12)
- Change color to red
- Rnd 4: sc in all 12 st (12)
- Change color to white
- Rnd 5: (sc, inc in next st) repeat 6 times (18)
- Change color to red
- Rnd 6: (sc in next 2 st, inc in next st) repeat 6 times (24)
- Fasten off with a slip stitch.
Hat brim:
- Use red yarn, crochet in rows
- Start making a chain
- Ch 4
- Row 1: Start in second ch from hook, BLO sc in next 3 st, ch 1, turn (3)
- Row 2-24: BLO sc in next 3 st, ch 1, turn (3)
- Fasten off and sew both ends together.
- Sew the top and brim together.
- The 24 rows do not exactly match the 30 stitches of the hat top, pin the hat top on the brim first, then start sewing, you need to skip a few stitches when sewing.
Pom Pom:
- Use red yarn to make the pom pom
- Wrap yarn around your finger, about 65 times. Take the yarn from you finger and wrap a piece of yarn around it, make a knot. Now cut both sides of the yarn (see photo’s) You will get a messy ball of yarn this way. Cut it into shape to get a nice round mini pom pom. Sew the pom pom on the hat.

Tail:
- Use white yarn
- Rnd 1: start 5 sc in a magic ring (5)
- Rnd 2: sc in all 5 st (5)
- Fasten off with a slip stitch, leave a long piece of yarn to sew the tail on the back if the body.
- Now your Polar Bear is done! I hope you enjoyed this cute free Amigurumi polar bear crochet pattern. There are many more Amigurumi crochet patterns on my blog.