

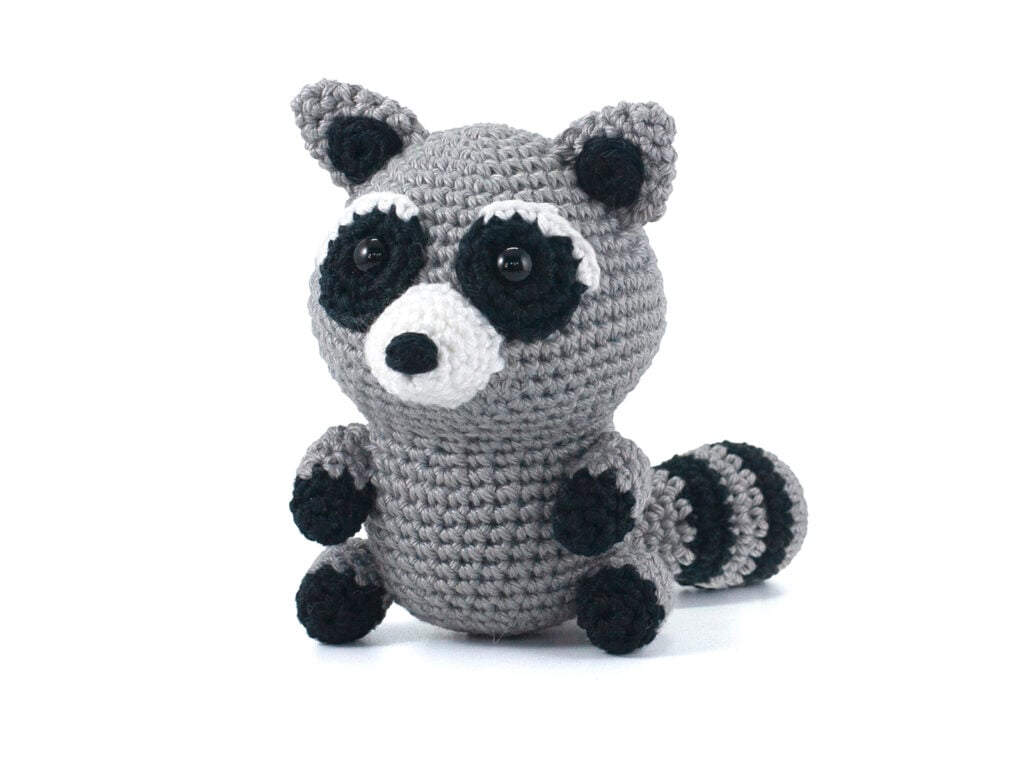
Free Raccoon crochet pattern

Robbie the Raccoon Amigurumi
Crochet a very cute raccoon with this free raccoon crochet pattern. You can crochet him with any yarn that you like, make sure to use the smallest crochet hook recommended on the label of the yarn.
Size raccoon made with sport weight cotton yarn: 11 cm / 4 inch.
Robbie the Raccoon greatest wish is to be able to fly. Sometimes he gets into big trees and jumps out of them to try to fly. But he always fails. Luckily his friends always save him from a hard fall.
After his last jump he decided that it’s a better idea to just look at the birds from a high tree instead of trying to fly himself.
Table of contents
Basic Stitches Tutorial
If you are a beginner that want to learn how to crochet, check out my beginner-friendly basic stitches tutorial, it has many instructional videos on how to crochet every stitch. It shows you all you need to know to make your very own cute Raccoon Amigurumi with this free animal crochet pattern.
Materials
These are the materials that I used. You can replace them with other
materials. If you wish to make a larger or smaller version of this Amigurumi,
you can just use a thicker or thinner yarn/crochet hook.
Small raccoon 4 inch / 11 cm
– Grey cotton – Yarn and Colors Must Have color: 096
– Black cotton – Yarn and Colors Must Have color: 100
– White cotton – Yarn and Colors Must Have color: 001
– Synthetic Poly filling
– 1 safety eyes size: 8 mm
– Crochet hook size B/1 (2.5 mm)
Search for a similar cotton yarn you can buy near you on YARNSUB
Big raccoon 8 inch / 20 cm
– Grey, black and white velvet yarn
– Synthetic Poly filling
– 1 safety eyes size: 10 mm
– Crochet hook size B/1 (2.5 mm)
Check the materials page on my website if you need help in choosing the right materials.
Supplies:
Scissors
Tapestry needles with blunt point, nr. 16
Pins
Abbreviations (U.S. Terms) used in this free reindeer crochet pattern:
(All abbreviations are explained in my basic stitches tutorial)
Rnd: Round
st: stitch
sc: single crochet
sl st: slip stitch
dec: decrease
inc: increase

Free Raccoon Crochet Pattern
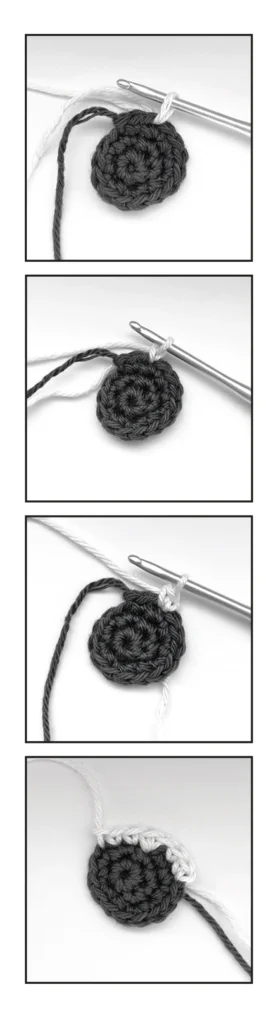
Left eye spot:
- Start with black yarn
- Rnd 1: start 6 sc in a magic ring (6)
- Rnd 2: inc 6 times (12)
- Mark the 7th stitch of Rnd 3 with a stitch marker.
- Rnd 3: sc, inc in next 3 st, sc (8) leave the remaining stitches unworked.
- Fasten off with a slst in the next st, leaving a long yarn tail.
Join white yarn in the 7th st of Rnd 3 (the stitch you marked in round 3)
ch 1, sc in the 7th st & 8th st, inc in the 6st st of Rnd 2, sc in the 7nd and 8rd st, sl st in the 9th stitch.
(see photo’s below)
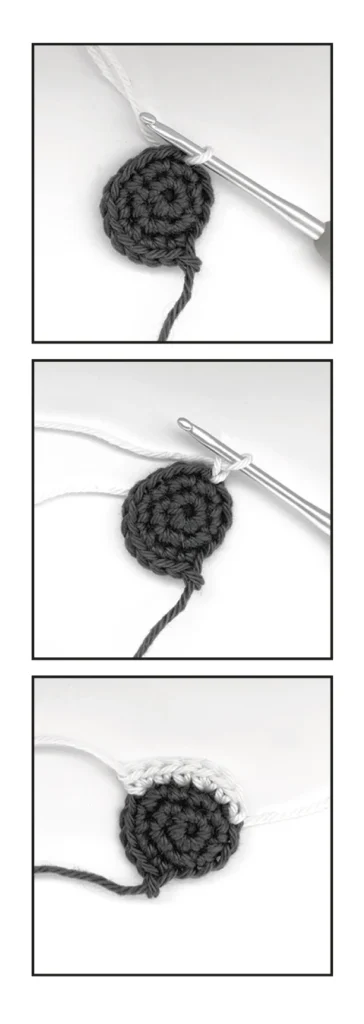
Right eye spot:
- Start with black yarn
- Rnd 1: start 6 sc in a magic ring (6)
- Mark the 10th stitch of Rnd 2 with a stitch marker.
- Rnd 2: inc 6 times (12)
- Rnd 3: sc, inc in next 3 st, sc (8) leave the remaining stitches unworked.
- Fasten off with a slst.
Join white yarn in the 10th st of Rnd 2 (the stitch you marked in round 2)
ch 1, sc in the next st, inc in the next st, sc in the next 2 st, inc in the next st
(see photo’s below)
Body:
- Start with grey yarn
- Rnd 1: start 6 sc in a magic ring (6)
- Rnd 2: inc 6 times (12)
- Rnd 3: (sc, inc in next st) repeat 6 times (18)
- Rnd 4: (sc in next 2 st, inc in next st) repeat 6 times (24)
- Rnd 5: (sc in next 3 st, inc in next st) repeat 6 times (30)
- Rnd 6: sc in all 30 st (30)
- Rnd 7: (sc in next 4 st, inc in next st) repeat 6 times (36)
- Rnd 8: sc in all 36 st (36)
- Rnd 9: (sc in next 5 st, inc in next st) repeat 6 times (42)
- Rnd 10: (sc in next 6 st, inc in next st) repeat 6 times (48)
- Rnd 11: (sc in next 7 st, inc in next st) repeat 6 times (54)
- Rnd 12-14: sc in all 54 st (54)
- Rnd 15: (sc in next 7 st, dec) repeat 6 times (48)
- Rnd 16: (sc in next 6 st, dec) repeat 6 times (42)
- Rnd 17: (sc in next 5 st, dec) repeat 6 times (36)
- Rnd 18: (sc in next 4 st, dec) repeat 6 times (30)
- Rnd 19: (sc in next 3 st, dec) repeat 6 times (24)
- Rnd 20: sc in all 24 st (24)
- Rnd 21: (sc in next 3 st, inc in next st) repeat 6 times (30)
- Rnd 22: (sc in next 9 st, inc in next st) repeat 3 times (33)
- Rnd 23-28: sc in all 33 st (33)
- Push the safety eyes through the middle of the first round of the eye spots.
- Now put the safety eyes between rounds 9 and 10 of the body with an interspace of 6 stitches.
- (see this video on how to place safety eyes the easy way)
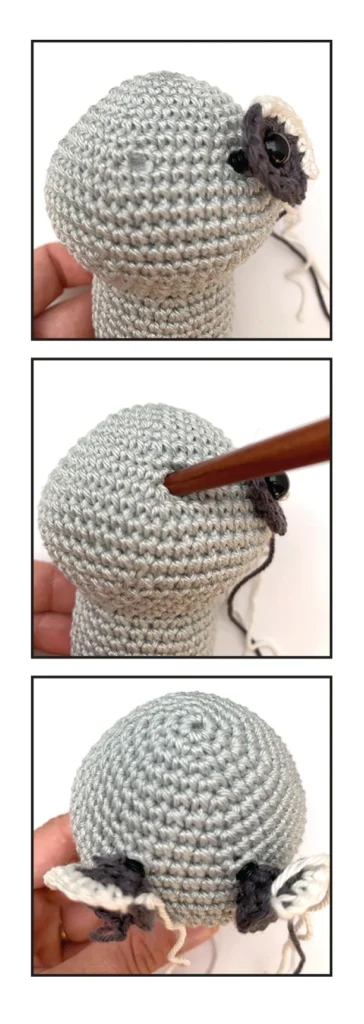
- Put stuffing in the head and sew the eyesspot on the head between rounds 6 and 13.
- Rnd 29: (sc in next 9 st, dec) repeat 3 times (30)
- Rnd 30: sc in all 30 st (30)
- Rnd 31: (sc in next 3 st, dec) repeat 6 times (24)
- Rnd 32: (sc in next 2 st, dec) repeat 6 times (18)
- Rnd 33: (sc in next st, dec) repeat 6 times (12)
- Rnd 34: dec 6 times (6)
- Finish the body by taking the last strand of yarn and sewing it through the front loops of every crochet stitch that you made in the last round. Pull the yarn tight to close the hole. Now stick a needle under the hole and weave in the yarn end.
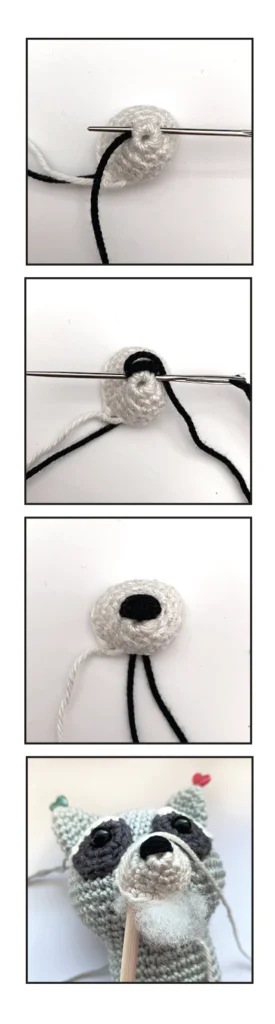
Snout
- Use white yarn
- Rnd 1: start 6 sc in a magic ring (6)
- Rnd 2: (sc, inc in next st) repeat 3 times (9)
- Rnd 3: (sc in next 2 st, inc in next st) repeat 3 times (12)
- Rnd 4: (sc in next 3 st, inc in next st) repeat 3 times (15)
- Rnd 5: sc in all 15 st (15)
- Fasten off with a slst in the next st, leaving a long yarn tail.
- Embroider a nose on the snout with black yarn between rounds 1 and 2, the nose is 2 stitches wide (see photo’s below)..
- Put stuffing in the snout. Sew the snout on the head between rounds 10 and 16 of your raccoon.
Ear 2x:
- Use grey yarn
- Rnd 1: start 4 sc in a magic ring (4)
- Rnd 2: (sc, inc in next st) repeat 2 times (6)
- Rnd 3: (sc, inc in next st) repeat 3 times (9)
- Rnd 4: sc in all 9 st (9)
- Rnd 5: (sc in next 2 st, inc in next st) repeat 3 times (12)
- Rnd 6: sc in all 12 st (12)
- Fasten off with a slst in the next st, leaving a long yarn tail.
- Flatten the ears and sew the ears between rounds 3 and 9.
Ear inside 2x:
- Start with black yarn
- Rnd 1: start 6 sc in a magic ring (6)
- Fasten off with a slst in the next st, leaving a long yarn tail.
- Sew the ear insides on the ears that you allready sewed on the head.
Arm 2x:
- Start with black yarn
- Rnd 1: start 6 sc in a magic ring (6)
- Rnd 2: (sc in next 2 st, inc in next st) repeat 2 times (8)
- Rnd 3: sc in all 8 st (8)
- Change color to grey
- Rnd 4-6: sc in all 8 st (8)
- Put stuffing in the arms.
- Rnd 7: (sc in next 2 st, dec) repeat 2 times (6)
- Finish the arm by taking the last strand of yarn and sewing it through the front loops of every crochet stitch that you made in the last round. Pull the yarn tight to close the hole. Now stick a needle under the hole and weave in the yarn end. Sew rounds 1-3 of the arms on the side of the body on rounds 22 and 23.
Leg 2x:
- Start with black yarn
- Rnd 1: start 6 sc in a magic ring (6)
- Rnd 2: (sc, inc in next st) repeat 3 times (9)
- Rnd 3: sc in all 9 st (9)
- Change color to grey
- Rnd 4-7: sc in all 9 st (9)
- Put stuffing in the leg.
- Rnd 8: (sc in next st, dec) repeat 3 times (6)
- Finish the leg by taking the last strand of yarn and sewing it through the front loops of every crochet stitch that you made in the last round. Pull the yarn tight to close the hole. Now stick a needle under the hole and weave in the yarn end.
- Sew rounds 1-3 of the legs to the side of the body on rounds 28 and 29.

Tail:
- Start with grey yarn
- Rnd 1: start 6 sc in a magic ring (6)
- Rnd 2: inc 6 times (12)
- Rnd 3: (sc, inc in next st) repeat 6 times (18)
- Rnd 4: sc in all 18 st (18)
- Change color to black
- Rnd 5-6: sc in all 18 st (18)
- Change color to grey
- Rnd 7-8: sc in all 18 st (18)
- Change color to black
- Rnd 9: sc in all 18 st (18)
- Rnd 10: (sc in next 4 st, dec) repeat 3 times (15)
- Change color to grey
- Rnd 11: (sc in next 3 st, dec) repeat 3 times (12)
- Rnd 12: sc in all 12 st (12)
- Rnd 13: (sc in next 2 st, dec) repeat 3 times (9)
- Rnd 14-15: sc in all 9 st (9)
- Rnd 16: (sc in next 2 st, inc in next st) repeat 3 times (12)
- Rnd 17: sc in all 12 st (12)
- Fasten off with a slst in the next st, leaving a long yarn tail.
- Put stuffing in the tail.
- Sew the tail on the back of the body between rounds 26 and 32.
Now your raccoon is ready, I hope you enjoyed this cute free crochet pattern.
There are many more free amigurumi patterns on this website.