
Free Rat Crochet Pattern


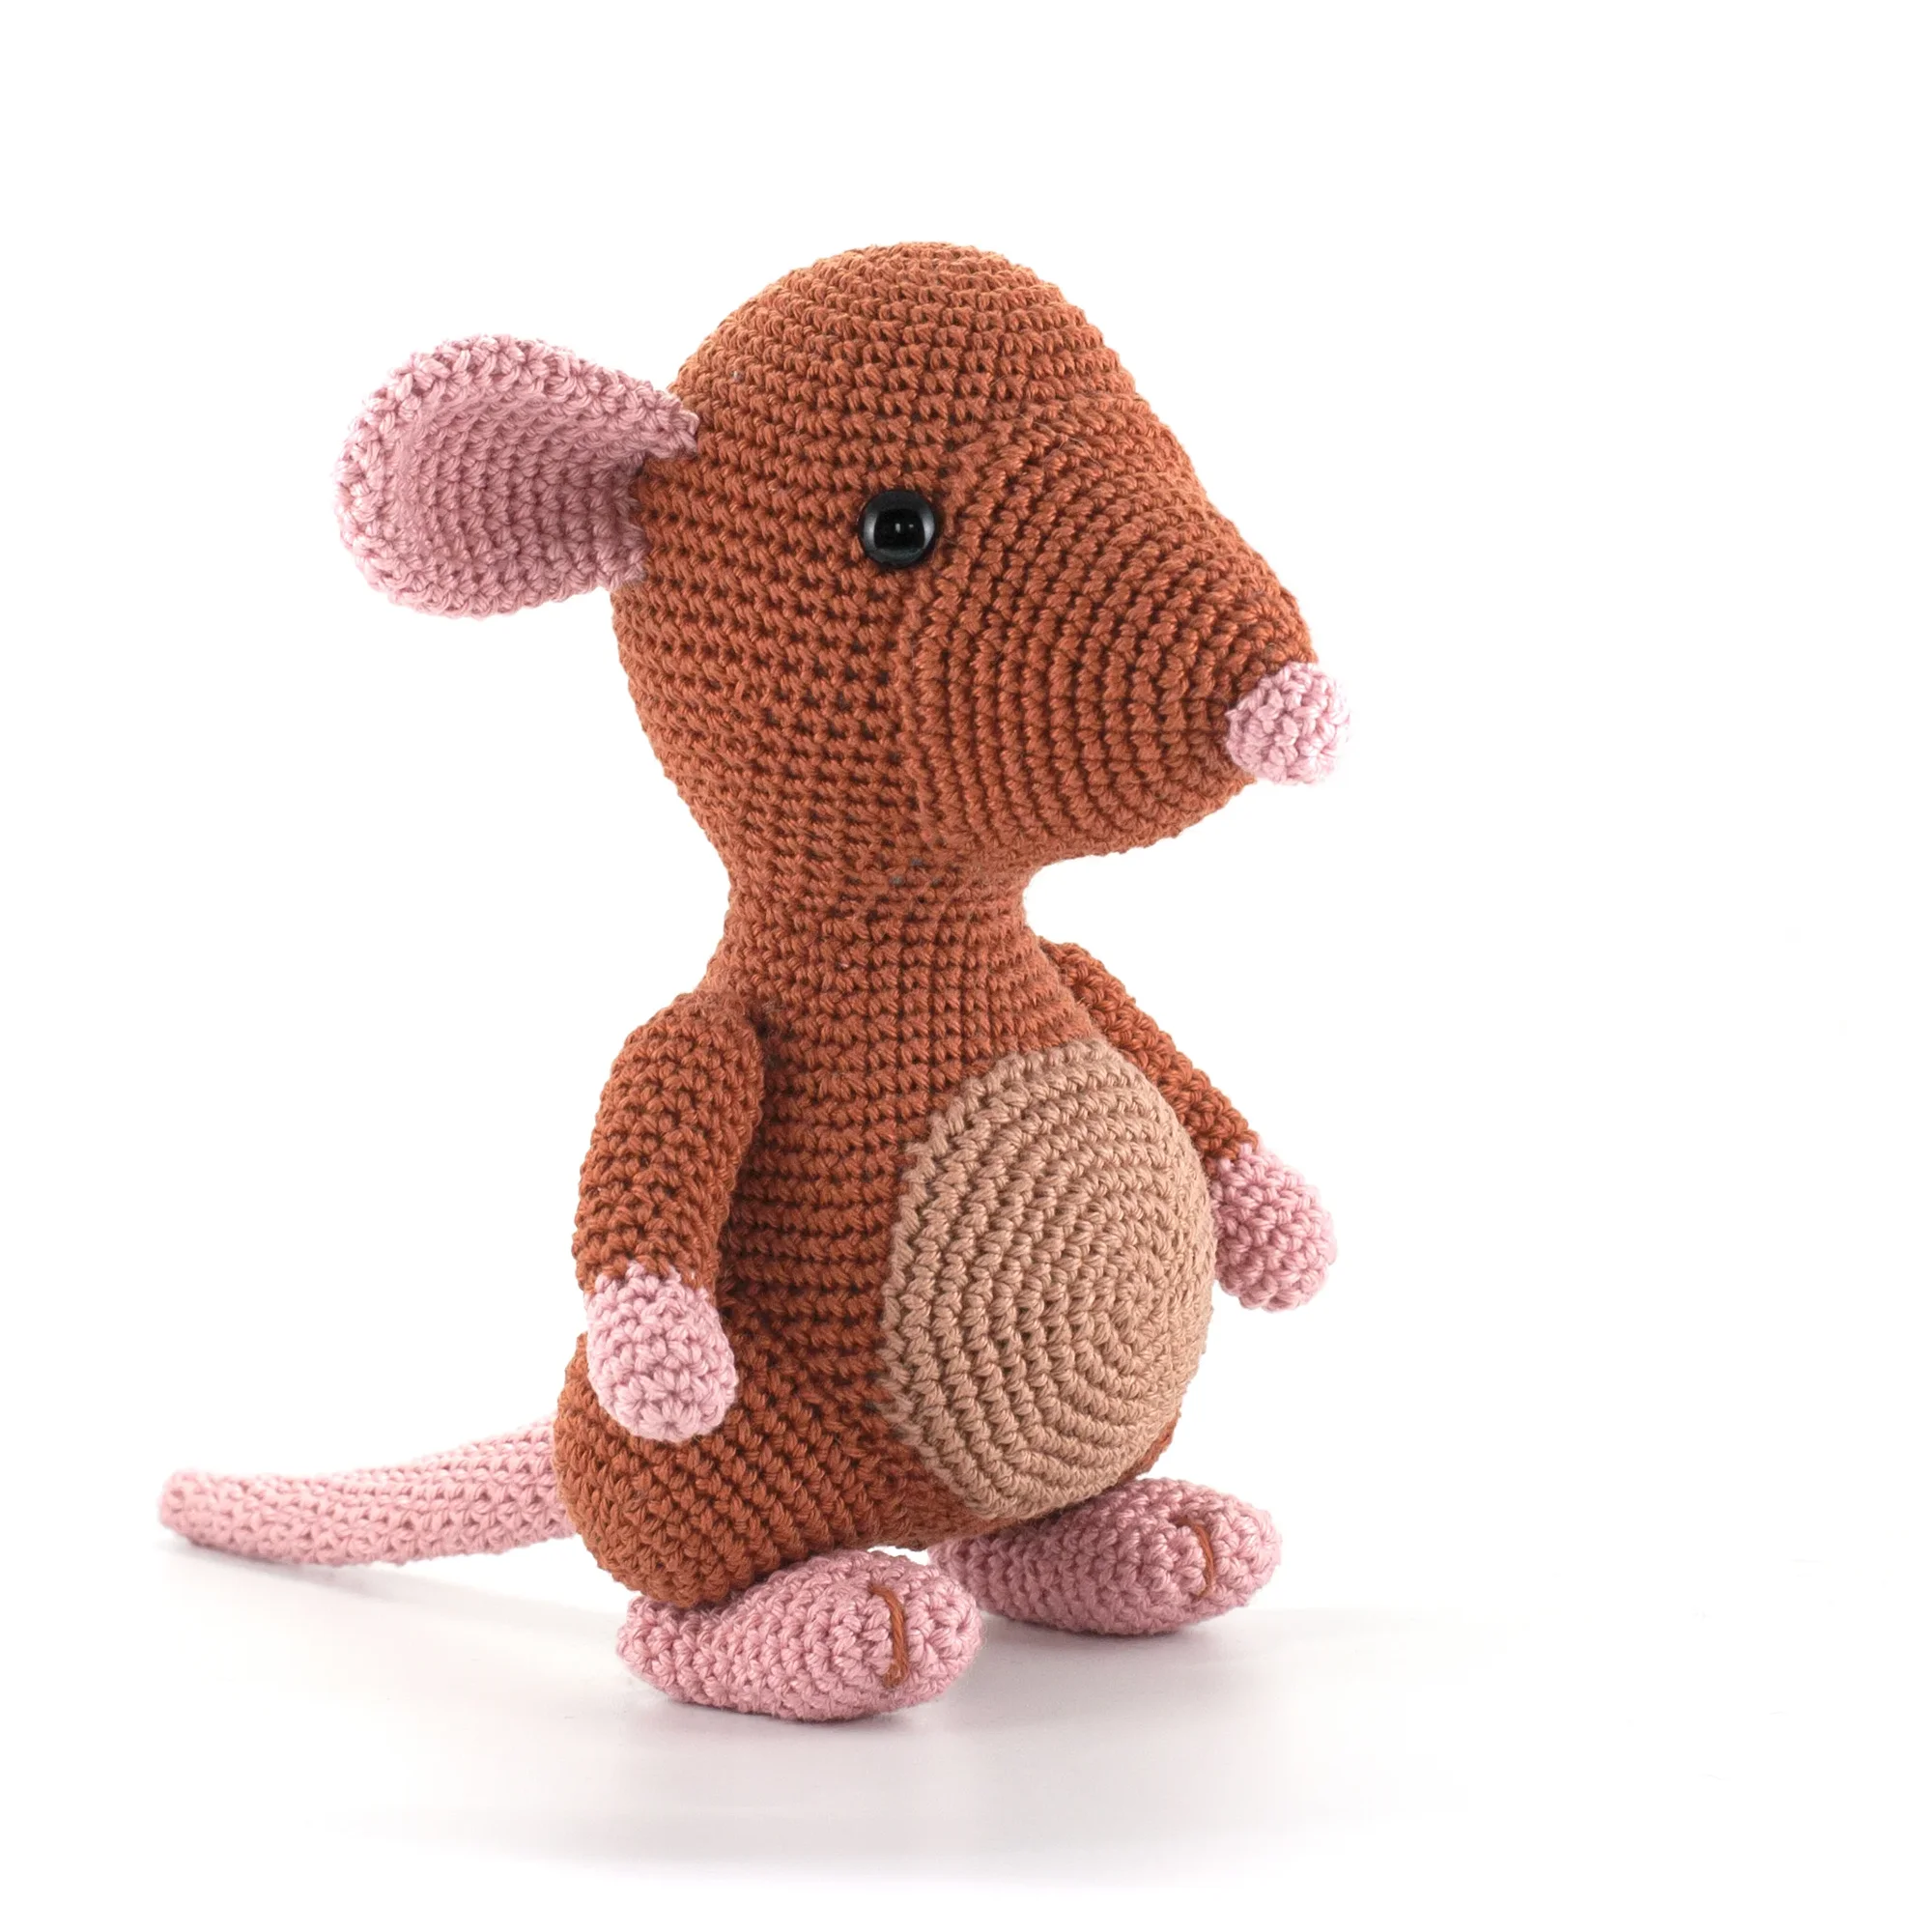
Rupert the Rat Amigurumi
Meet Rupert the Rat, an easy beginner friendly free rat Amigurumi crochet pattern by DIY Fluffies, suitable for any yarn.
This is a big Amigurumi, the Rat on the photo has been made with sport weight cotton yarn, which makes him 20 cm / 8 inch in height. Use thicker yarn and a bigger crochet hook to make a larger rat.
A little story about Rupert the Rat:
Rupert the Rat loves chocolate, he is always looking for a piece wherever he can.
When he finds some he likes to eat it with his friends, because it is much more fun to share then eat alone.
Table of contents

PDF Pattern
PDF Pattern without ads:
If you prefer a pdf download or want to support me, you can buy the pdf pattern in my etsy shop, thank you so much for your support! (Keep scrolling for the free pattern)
Basic Stitches Tutorial
If you’re new to crocheting, don’t worry! Check out my beginner-friendly basic stitches tutorial, complete with numerous instructional videos. It covers everything you need to know to make your very own adorable Amigurumi plushie toy.
Materials
These are the materials that I used. However, feel free to replace them with other materials of your choice. Furthermore, if you wish to crochet a larger or smaller version of this stuffed animal using this free rat amigurumi crochet pattern, you can simply use a thicker or thinner yarn and crochet hook.
Cotton Sport Weight version 5 cm / 2 inch:
– 2x Brown cotton yarn SMC Catania color: 426
– Pink cotton yarn SMC Catania color: 408
– Beige cotton yarn SMC Catania color: 437
– Synthetic Poly Filling
– Crochet hook size B/1 (2.5 mm)
– 1 Pair safety eyes 11 mm
Search for a similar cotton yarn you can buy near you on YARNSUB
Supplies:
– Scissors
– Tapestry needles with blunt point, nr. 16 or 17
– Pins
TIP: Are you using are using Blanket yarn? Then I recommend a L/11 (8.0 mm) crochet hook.
For Super Bulky Chenille yarn I recommend a H/8 (5.0 mm) crochet hook, for bulky velvet yarn a E/4 (3.5 mm) crochet hook.

Abbreviations
Abbreviations used in this cute crochet pattern:
(All abbreviations are explained in my basic stitches tutorial)
Rnd: Round
st: stitch
sc: single crochet
sl st: slip stitch
dec: decrease
inc: increase
Free Rat Crochet Pattern
Head and Body:
- Use brown yarn
- Rnd 1: start 6 sc in a magic ring (6)
- Rnd 2: inc in all 6 st (12)
- Rnd 3: (sc in next st, inc in next st) repeat 6 times (18)
- Rnd 4: (sc in next 2 st, inc in next st) repeat 6 times (24)
- Rnd 5: (sc in next 3 st, inc in next st) repeat 6 times (30)
- Rnd 6: sc in all 30 st (30)
- Rnd 7: (sc in next 4 st, inc in next st) repeat 6 times (36)
- Rnd 8: sc in all 36 st (36)
- Rnd 9: (sc in next 5 st, inc in next st) repeat 6 times (42)
- Rnd 10: sc in all 42 st (42)
- Rnd 11: (sc in next 6 st, inc in next st) repeat 6 times (48)
- Rnd 12: sc in all 48 st (48)
- Rnd 13: (sc in next 7 st, inc in next st) repeat 6 times (54)
- Rnd 14-20: sc in all 54 st (54)
- Insert the safety eyes between rounds 14 and 15, one eye between stitches 11-12 and the other between stitches 27-28
- Rnd 21: (sc in next 7 st, dec) repeat 6 times (48)
- Rnd 22: sc in all 48 st (48)
- Rnd 23: (sc in next 6 st, dec) repeat 6 times (42)
- Rnd 24: sc in all 42 st (42)
- Rnd 25: (sc in next 5 st, dec) repeat 6 times (36)
- Rnd 26: (sc in next 4 st, dec) repeat 6 times (30)
- Rnd 27: sc in all 30 st (30)
- Rnd 28: (sc in next 3 st, dec) repeat 6 times (24)
- Rnd 29-30: sc in all 24 st (24)
- Rnd 31: (sc in next 3 st, inc in next st) repeat 6 times (30)
- Rnd 32: sc in all 30 st (30)
- Rnd 33: (sc in next 4 st, inc in next st) repeat 6 times (36)
- Rnd 34: sc in all 36 st (36)
- Stuff the head with filling.
- Rnd 35: sc in next 11 st, inc in next st, sc in next 5 st, inc in next st, sc in next 5 st, inc in next st, sc in next 12 st (39)
- Rnd 36: sc in all 39 st (39)
- Rnd 37: sc in next 12 st, inc in next st, sc in next 6 st, inc in next st, sc in next 6 st, inc in next st, sc in next 12 st (42)
- Rnd 38: sc in all 42 st (42)
- Rnd 39: (sc in next 6 st, inc in next st) repeat 6 times (48)
- Rnd 40: sc in all 48 st (48)
- Rnd 41: sc in next 15 st, inc in next st, sc in next 7 st, inc in next st, sc in next 7 st, inc in next st, sc in next 16 st (51)
- Rnd 42-50: sc in all 51 st (51)
- Rnd 51: sc in next 16 st, dec, sc in next 7 st, dec, sc in next 7 st, dec, sc in next 15 st (48)
- Rnd 52: (sc in next 6 st, dec) repeat 6 times (42)
- Rnd 53: (sc in next 5 st, dec) repeat 6 times (36)
- Rnd 54: (sc in next 4 st, dec) repeat 6 times (30)
- Rnd 55: (sc in next 3 st, dec) repeat 6 times (24)
- Rnd 56: (sc in next 2 st, dec) repeat 6 times (18)
- Stuff the body with filling.
- Rnd 57: (sc, dec in next st) repeat 6 times (12)
- Rnd 58: dec 6 times (6)
- Fasten off. Finish the head by taking the last strand of yarn and sewing it through the front loops of every crochet stitch that you made in the last round. Pull the yarn tight to close the hole. Now stick a needle under the hole and weave in the yarn end.

Snout:
- Use brown yarn
- Rnd 1: start 6 sc in a magic ring (6)
- Rnd 2: inc in all 6 st (12)
- Rnd 3: sc in all 12 st (12)
- Rnd 4: (sc in next st, inc in next st) repeat 6 times (18)
- Rnd 5: (sc in next 2 st, inc in next st) repeat 6 times (24)
- Rnd 6: sc in all 24 st (24)
- Rnd 7: (sc in next 3 st, inc in next st) repeat 6 times (30)
- Rnd 8: sc in all 30 st (30)
- Rnd 9: (sc in next 4 st, inc in next st) repeat 6 times (36)
- Rnd 10-11: sc in all 36 st (36)
- Rnd 12: (sc in next 5 st, inc in next st) repeat 6 times (42)
- Rnd 13: sc in all 42 st (42)
- Rnd 14: (sc in next 6 st, inc in next st) repeat 6 times (48)
- Fasten off with a slip stitch,, leave a long piece of yarn to sew the snout onto the head of your rat Amigurumi. Stuff the Snout with filling.
- Sew the snout between the eyes, between rounds 9 and 28.

Nose:
- Use pink yarn
- Rnd 1: start 6 sc in a magic ring (6)
- Rnd 2: (sc in next st, inc in next st) repeat 3 times (9)
- Rnd 3: sc in all 9 st (9)
- Fasten off with a slip stitch, leave a long piece of yarn to sew the nose onto the snout. Sew the nose on the snout. The top side of the nose on round 1 and the bottom side on round 2.

Ear 2x:
- Use pink yarn
- Rnd 1: start 6 sc in a magic ring (6)
- Rnd 2: inc in all 6 st (12)
- Rnd 3: (sc in next st, inc in next st) repeat 6 times (18)
- Rnd 4: sc in all 18 st (18)
- Rnd 5: (sc in next 2 st, inc in next st) repeat 6 times (24)
- Rnd 6-9: sc in all 24 st (24)
- Rnd 10: (sc in next 6 st, dec) repeat 3 times (21)
- Rnd 11: sc in all 21 st (21)
- Rnd 12: (sc in next 5 st, dec) repeat 3 times (18)
- Rnd 13-14: sc in all 18 st (18)
- Fasten off with a slip stitch, leave a long piece of yarn to sew the ears onto the head.
- Do not put stuffing in the ears. Flatten the ears and then fold the bottom a bit and sew them on the side of head between rounds 13-19. There are 8 stitches between the eyes and the ears.
Arm 2x:
- Start with pink yarn
- Rnd 1: start 6 sc in a magic ring (6)
- Rnd 2: inc in all 6 st (12)
- Rnd 3-4: sc in all 12 st (12)
- Rnd 5: (sc in next 4 st, dec) repeat 2 times (10)
- Rnd 6: sc in all 10 st (10)
- Change to brown yarn
- Learn how to color change with my color change tutorial
- Rnd 7-10: sc in all 10 st (10)
- Rnd 11: (sc in next 4 st, inc in next st) repeat 2 times (12)
- Rnd 12-13: sc in all 12 st (12)
- Rnd 14: (sc in next 5 st, inc in next st) repeat 2 times (14)
- Rnd 15-17: sc in all 14 st (14)
- Rnd 18: (sc in next 5 st, dec) repeat 2 times (12)
- Rnd 19: dec 6 times (6)
- Fasten off. Stuff the arm with filling. Finish the arm by taking the last strand of yarn and sewing it through the front loops of every crochet stitch that you made in the last round. Pull the yarn tight to close the hole.
- Sew the arms on the side of the body onto rounds 35-38 or your rat Amigurumi.

Belly:
- Use beige yarn
- Rnd 1: start 6 sc in a magic ring (6)
- Rnd 2: inc in all 6 st (12)
- Rnd 3: (sc in next st, inc in next st) repeat 6 times (18)
- Rnd 4: (sc in next 2 st, inc in next st) repeat 6 times (24)
- Rnd 5: (sc in next 3 st, inc in next st) repeat 6 times (30)
- Rnd 6: (sc in next 4 st, inc in next st) repeat 6 times (36)
- Rnd 7: (sc in next 5 st, inc in next st) repeat 6 times (42)
- Rnd 8: (sc in next 6 st, inc in next st) repeat 6 times (48)
- Rnd 9: sc in all 48 st (48)
- Fasten off with a slip stitch, leave a long piece of yarn to sew the belt onto the body.
- Sew the belly between rounds 36 and 55.
Leg 2x:
- Use brown yarn
- Rnd 1: start 6 sc in a magic ring (6)
- Rnd 2: inc in all 6 st (12)
- Rnd 3: (sc in next st, inc in next st) repeat 6 times (18)
- Rnd 4: (sc in next 2 st, inc in next st) repeat 6 times (24)
- Rnd 5: sc in all 24 st (24)
- Rnd 6: (sc in next 3 st, inc in next st) repeat 6 times (30)
- Rnd 7: sc in all 30 st (30)
- Rnd 8: (sc in next 4 st, inc in next st) repeat 6 times (36)
- Rnd 9-11: sc in all 36 st (36)
- Fasten off with a slip stitch, leave a long piece of yarn to sew the legs onto the body. Stuff the leg with filling
- Sew the legs on the side of the body between rounds 43 and 57.
Foot 2x:
- Start with pink yarn
- Rnd 1: start 6 sc in a magic ring (6)
- Rnd 2: inc in all 6 st (12)
- Rnd 3: (sc in next st, inc in next st) repeat 6 times (18)
- Rnd 4-8: sc in all 18 st (18)
- Rnd 9: (sc in next 4 st, dec) repeat 3 times (15)
- Rnd 10: (sc in next 3 st, dec) repeat 3 times (12)
- Rnd 11-14: sc in all 12 st (12)
- Put stuffing in the Foot.
- Use a piece of brown yarn to sew the toes on the feet. Sew between rounds 3-4.
- Rnd 15: dec 6 times (6)
- Fasten off. Finish the foot by taking the last strand of yarn and sewing it through the front loops of every crochet stitch that you made in the last round. Pull the yarn tight to close the hole. Now stick a needle under the hole and weave in the yarn end.
- Sew the feet on the bottom side of the legs between rounds 4 and 8.
Tail:
- Use with pink yarn
- Rnd 1: start 6 sc in a magic ring (6)
- Rnd 2-4: sc in all 6 st (6)
- Rnd 5: inc, sc in next 5 st (7)
- Rnd 6-8: sc in all 7 st (7)
- Rnd 9: inc, sc in next 6 st (8)
- Rnd 10-12: sc in all 8 st (8)
- Rnd 13: inc, sc in next 7 st (9)
- Rnd 14-16: sc in all 9 st (9)
- Rnd 17: inc, sc in next 8 st (10)
- Rnd 18-25: sc in all 10 st (10)
- Rnd 26: (sc in next 4 st, inc in next st) repeat 2 times (12)
- Rnd 27: sc in all 12 st (12)
- Rnd 28: (sc in next 5 st, inc in next st) repeat 2 times (14)
- Rnd 29: sc in all 14 st (14)
- Fasten off with a slip stitch, leave a long piece of yarn to sew the tail onto the body.
- If you want you can put a bit of stuffing in the tail. Don’t put to much in it if you want to be able to bend it. Sew the tail on the back of the body between rounds 48 and 53.
- Now your stuffed animal is done, I hope you enjoyed this free rat Amigurumi crochet pattern.
There are many more cute plushie toy patterns on my blog.
