

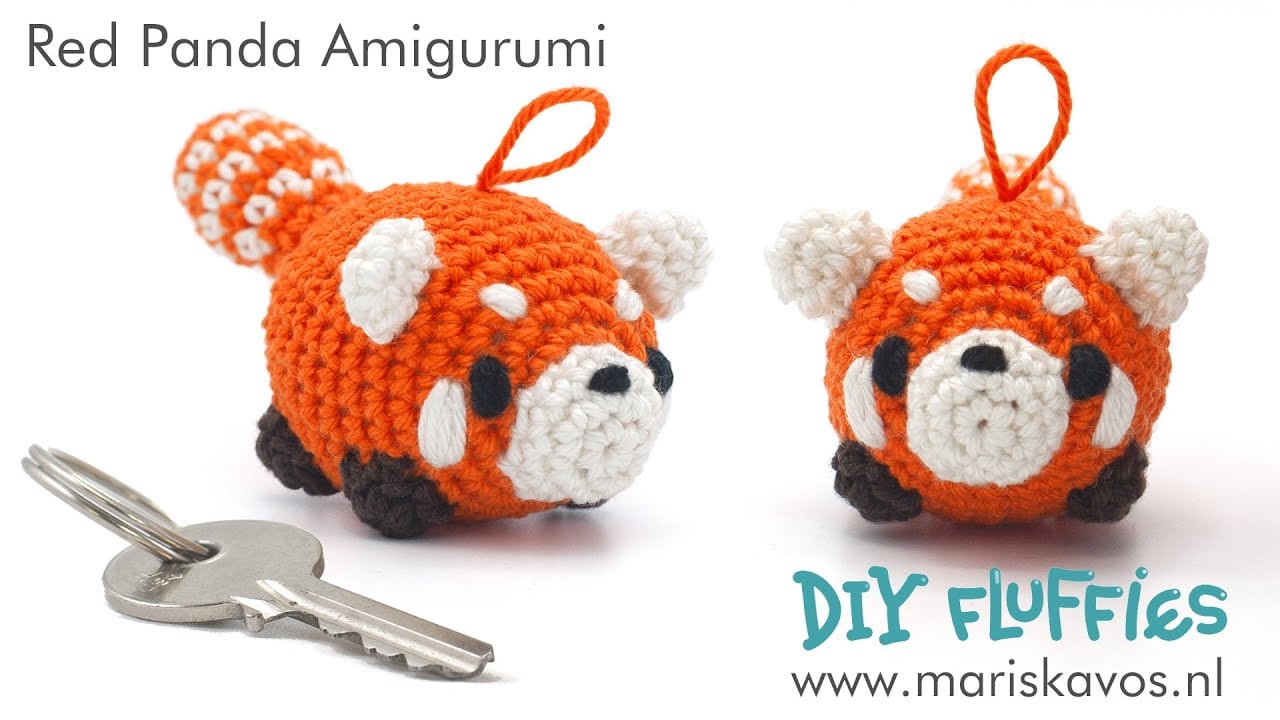
Free Red Panda Crochet Pattern

Mini Red Panda keychain Amigurumi
Crochet a very cute red panda Amigurumi keychain with this free amigurumi pattern. This is a small crochet project that you can make in about one hour.
It is a great pattern for left over yarn, because it is so small. I love making mini amigurumi, because they just take a little bit of time to create a very cute gift.
I made the small keychain version from sport weight cotton yarn. But you can also crochet the red panda from bigger yarn, for example plush chenille yarn, your Amigurumi will become bigger and very huggable.
I also have a full video on YouTube on how to crochet every step of this Red Panda Amigurumi:
If you are new to crochet, please check my basic stitches tutorial to learn how to crochet.
Materials
These are the materials that I used. You can replace them with other materials. If you wish to crochet a larger or smaller version of this mini red panda amigurumi you can just use a thicker or thinner yarn/crochet hook.
Cotton Sport Weight version 6 cm / 2 inch:
– Orange catania cotton color: 189
– Brown catania cotton color: 162
– White catania cotton color – 105
– Black catania cotton color – 110
– Synthetic Poly filling
Chenille Super Bulky version 12 cm / 5 inch:
– Orange Chenille yarn
– Brown Chenille yarn
– White Chenille yarn
– Black Chenille yarn
– Synthetic Poly filling
TIP Chenille/Velvet or other similar yarn: The body of the cat might look a bit to oval when crocheting it, don’t worry about it, it will be fine when you put stuffing in it.
Check the materials page on my website if you need help in choosing the right materials.
Supplies:
– Scissors
– Tapestry needles with blunt point, nr. 16 or 17
– Pins
– Crochet hook size B/1 (2.5 mm) for the cotton or H/8 (5.0 mm) for Chenille yarn
Abbreviations
Abbreviations (U.S. Terms) used in this free cute red panda crochet pattern:
(All abbreviations are explained in my basic stitches tutorial)
Rnd: Round
st: stitch
sc: single crochet
sl st: slip stitch

TIP: Before starting this free red panda crochet pattern, beginners should remember that there is a full video tutorial on how to create this cute keychain plushie Amigurumi: https://youtu.be/JB-oQNMsWRI
Free Red Panda Crochet Pattern
Body:
- Use orange yarn
- Rnd 1: start 6 sc in a magic ring (6)
- Rnd 2: inc 6 times (12)
- Mark the beginning of round 3 with a piece of yarn if you haven’t already, so you can count the stitches later.
- Rnd 3: (sc, inc in next st) repeat 6 times (18)
- Rnd 4: (sc in next 2 st, inc in next st) repeat 6 times (24)
- Rnd 5: (sc in next 7 st, inc in next st) repeat 3 times (27)
- Rnd 6-13: sc in all 27 st (27)
- If you want you can turn the red panda into a keychain by sewing two strands of folded yarn in the top between rows 9 and 10 and secure it on the inside of the body.
- Embroider the eyes on the body between rows 3 and 4 and the 5th and 14 stitch.
- Embroider the eyebrows on round 4 with and interspace of 6 stitches.
- Embroider the cheeks on round 5, the cheeks are 3 stitches wide, the top is placed next to the eye.
- If you need help sewing on the eyes, cheeks and eyebrows please check my video: https://youtu.be/JB-oQNMsWRI

- Rnd 14: (sc in next 7 st, dec) repeat 3 times (24)
- Rnd 15: (sc in next 2 st, dec) repeat 6 times (18)
- Stuff the head with filling.
- Rnd 16: (sc in next st, dec) repeat 6 times (12)
- Rnd 17: dec 6 times (6)
- Finish the head or your red panda by taking the last strand of yarn and sewing it through the front loops of every crochet stitch that you made in the last round. Pull the yarn tight to close the hole. Now stick a needle under the hole and weave in the yarn end.
Ear 2x:
- Use white yarn
- Rnd 1: start 4 sc in a magic ring (4)
- Rnd 2: sc, inc in next st) repeat 2 times (6)
- Rnd 3: sc in all 6 st (6)
- Fasten off, leaving a long tail for sewing. Fold the ears to flatten them.
- Sew round 3 of the ear on round 7 of the body, with 6 stitches between both ears.

Snout
- Use white yarn
- Rnd 1: start 6 sc in a magic ring (6)
- Rnd 2: inc 6 times (12)
- Rnd 3: sc in all 12 st (12)
- Fasten off, leaving a long tail for sewing.
- Sew the snout on the body, with the top of the snout below round 2 and the bottom above round 4. Just before you finish sewing on the snout, embroider the nose between round 3 and 4 of the snout. The nose is 1 stitch wide. You can put a bit of stuffing in the snout after you sewed the nose on the snout.
Legs 4x
- Use brown yarn
- Rnd 1: start 6 sc in a magic ring (6)
- Fasten off, leaving a long tail for sewing.
- Sew the legs on the bottom of the body with 4 stitches between the frontlegs and 4 stitches between the hindlegs, there are 4 rows between the frontlegs and hindlegs.
- For help: please check my free red panda crochet pattern video : https://youtu.be/JB-oQNMsWRI
Tail:
- Begin with orange yarn
- Rnd 1: start 6 sc in a magic ring (6)
- Rnd 2: inc 6 times (12)
- Rnd 3: sc in all 12 st (12)
- In the next round we are going to color change, change the color of the yarn in the last sc of the round. A detailed tutorial on color change can be found here.

- Change color to white
- Rnd 4: sc in all 12 st (12)
- Change color to orange
- Rnd 5: sc in all 12 st (12)
- Change color to white
- Rnd 6: sc in all 12 st (12)
- Change color to orange
- Rnd 7: sc in all 12 st (12)
- Change color to white
- Rnd 8: (sc in next 2 st, dec) repeat 3 times (9)
- Change color to orange
- Rnd 9-10: sc in all 9 st (9)
- Fasten off, leaving a long tail for sewing.
- Put stuffing in the tail. Sew the tail on rounds 15 and 16 of the body.
Now your red panda is done!
I hope you enjoyed this free red panda crochet pattern.
