
Free Snake Crochet Pattern


Simon the Snake Amigurumi
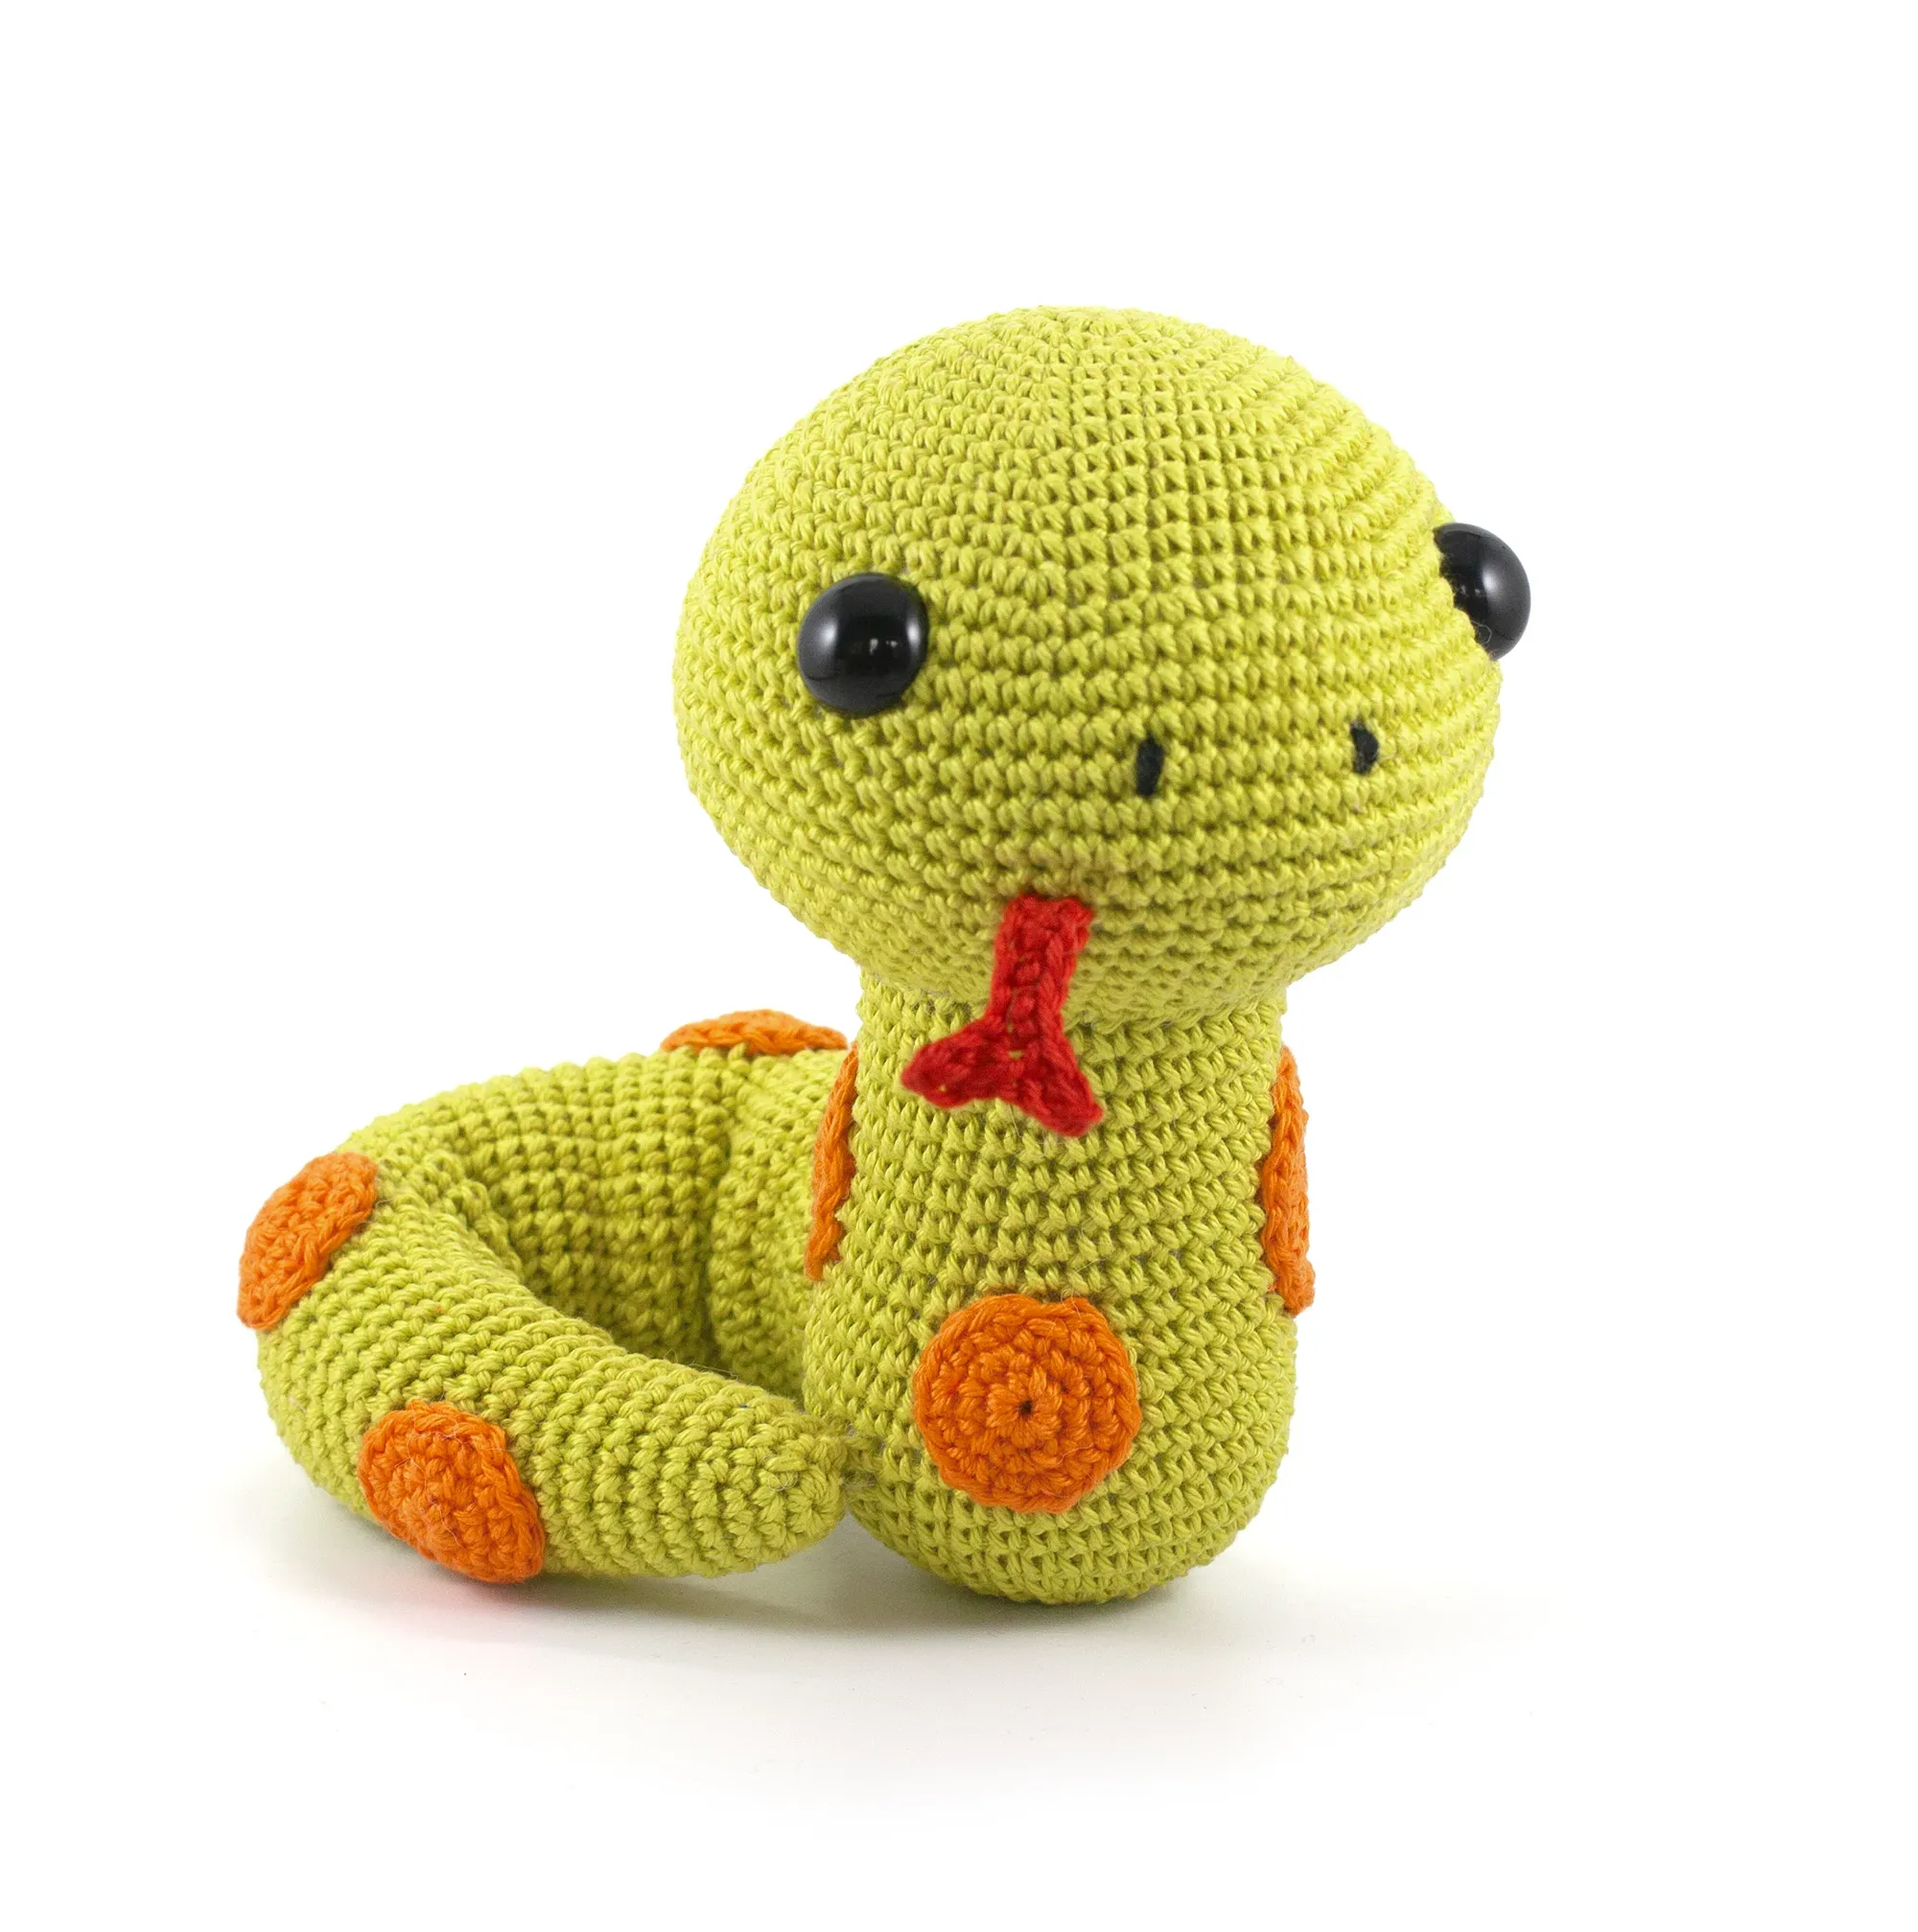
Create an adorable snake amigurumi with this free snake crochet pattern. This is an easy pattern, perfect for beginners. This Simon the Snake pattern is also featured in the book Amigurumi Made Easy, alongside many more cute Amigurumi animals.
The snake in the photo was made with sport-weight cotton yarn and a 2.5 mm hook. If you use the same yarn, your snake will be 15 cm (6 inches) tall.
2025 marks the chinese Lunar New Year of the Snake! This adorable Amigurumi is the perfect gift for anyone born in the Year of the Snake.
Table of contents
A little story about Simon the Snake
Simon is a snake who loves to read. He especially loves fantasy books and has read the Harry Potter series many times. Snakes play key roles in these stories! The only challenge Simon has when reading is turning the pages, but that doesn’t stop him from enjoying his favorite books.
PDF Pattern
PDF Pattern without ads:
If you prefer a pdf download or want to support me, you can buy the pdf pattern in my etsy shop, thank you so much for your support! (Keep scrolling for the free pattern)
Book: You can also find the pattern of Simon the Snake in the book Amigurumi Made Easy available on Amazon or other bookstores: www.mariskavos.nl/craft-books/

Basic Stitches Tutorial
If you are a beginner that want to learn how to crochet, check out my beginner-friendly basic stitches tutorial, it has many instructional videos on how to crochet every stitch. It shows you all you need to know to make your very own cute snake Amigurumi with this free snake crochet pattern.

Materials that you need
These are the materials that I used. However, feel free to replace them with other materials of your choice. Furthermore, if you wish to crochet a larger or smaller version of the snake amigurumi using this free stuffed animal crochet pattern, you can simply use a thicker or thinner yarn and crochet hook.
Cotton Sport Weight version 15 cm / 6 inch:
– Green Yarn and Colors Must Have color: 245: 44 gram
– Orange Yarn and Colors Must Have color: 281: 11 gram
– Black Yarn and Colors Must Have color: 110: 2 gram
– Red Yarn and Colors Must Have color: 115: 4 gram
– Synthetic Poly Filling
– Crochet hook size 2.5 mm
– Safety eyes 16 mm
Search for a similar cotton yarn you can buy near you on YARNSUB
Supplies:
– Scissors
– Tapestry needles with blunt point, nr. 16 or 17
– Pins
TIP: Are you using are using Blanket yarn? Then I recommend a 8.0 mm crochet hook.
For Super Bulky Chenille yarn I recommend a 5 mm crochet hook, for bulky velvet yarn a 3.5 mm crochet hook.
Abbreviations
Abbreviations used in this free snake crochet pattern:
(All abbreviations are explained in my basic stitches tutorial)
Rnd: Round
st: stitch
sc: single crochet
sl st: slip stitch
dec: decrease
inc: increase

Free Snake Crochet Pattern
Tongue:
- Use red yarn
- Ch 7.
- Work around both sides of the foundation chain.
- Row 1: start in second ch from hook, sc in next 2 st, ch 3, turn (photo 1) , start in second ch from hook, sc in next 6 st (photo 2).
- Fasten off, leaving a long tail for sewing (photo 3&4) .

Head:
- Use green yarn
- Rnd 1: start 6 sc in a magic ring (6)
- Rnd 2: inc in all 6 st (12)
- Rnd 3: (sc in next st, inc in next st) repeat 6 times (18)
- Rnd 4: (sc in next 2 st, inc in next st) repeat 6 times (24)
- Rnd 5: (sc in next 3 st, inc in next st) repeat 6 times (30)
- Rnd 6: (sc in next 4 st, inc in next st) repeat 6 times (36)
- Rnd 7: (sc in next 5 st, inc in next st) repeat 6 times (42)
- Rnd 8: sc in all 42 st (42)
- Rnd 9: (sc in next 6 st, inc in next st) repeat 6 times (48)
- Rnd 10: sc in all 48 st (48)
- Rnd 11: (sc in next 7 st, inc in next st) repeat 6 times (54)
- Rnd 12: (sc in next 8 st, inc in next st) repeat 6 times (60)
- Rnd 13: sc in next 17 st, (sc in next 2 st, inc in next st) repeat 4 times, sc in next 31 st (64)
- Mark the 16th and 40th stitch of round 14 with stitch markers. This will show you where to insert the safety eyes later.

- Rnd 14: sc in next 22 st, inc in next st, sc in next 6 st, inc in next st, sc in next 34 st (66)
- Rnd 15: sc in next 9 st, inc in next st, (sc in next 11 st, inc in next st) repeat 3 times, (sc in next 9 st, inc in next st) repeat 2 times (72)
- Mark the 27th and 34th stitch of round 17 with stitch markers. This will show you where to embroider the nostrils later.
- Rnd 16 – 19: sc in all 72 st (72)
- Insert the safety eyes between rounds 14 and 15, in the stitches you marked earlier. Embroider the nostrils on round 17, over the stitches you marked earlier.
- Mark the 23rd and 24th stitch of round 20. This will show you where to attach the tongue later.
- Rnd 20: sc in next 24 st, dec, sc in next 9 st, dec, sc in next 35 st (70)
- Rnd 21: sc in next 23 st, dec, sc in next 2 st, dec, sc in next 1 st, dec, sc in next 2 st, dec, sc in next 34 st (66)
- Rnd 22: (sc in next 9 st, dec) repeat 6 times (60)
- Rnd 23: (sc in next 8 st, dec) repeat 6 times (54)
- Sew the tongue between rounds 20 and 21, over the stitches you marked earlier.
- Rnd 24: (sc in next 7 st, dec) repeat 6 times (48)
- Rnd 25: (sc in next 6 st, dec) repeat 6 times (42)
- Rnd 26: (sc in next 5 st, dec) repeat 6 times (36)
- Rnd 27: (sc in next 4 st, dec) repeat 6 times (30)
- Rnd 28: (sc in next 3 st, dec) repeat 6 times (24)
- Rnd 29: (sc in next 2 st, dec) repeat 6 times (18)
- Put stuffing in the head and continue stuffing as you go.
- Rnd 30: (sc in next st, dec) repeat 6 times (12)
- Rnd 31: dec 6 times (6)
- Fasten off, leaving a yarn tail. Using your yarn needle, weave the yarn tail through the front loop of each remaining stitch and pull it tight to close. Weave in the yarn end.

Body:
- Use green yarn
- Rnd 1: start 6 sc in a magic ring (6)
- Rnd 2: inc in all 6 st (12)
- Rnd 3: (sc in next st, inc in next st) repeat 6 times (18)
- Rnd 4: (sc in next 2 st, inc in next st) repeat 6 times (24)
- Rnd 5: (sc in next 3 st, inc in next st) repeat 6 times (30)
- Rnd 6: (sc in next 4 st, inc in next st) repeat 6 times (36)
- Rnd 7 – 13: sc in all 36 st (36)
- Rnd 14: (sc in next 4 st, dec) repeat 6 times (30)
- Rnd 15 – 23: sc in all 30 st (30)
- Slst in next st. Fasten off, leaving a long tail for sewing. Put stuffing in the body
Sew the body to the head, between rounds 27-28.
Tail:
- Use green yarn
- Rnd 1: start 6 sc in a magic ring (6)
- Rnd 2: inc in all 6 st (12)
- Rnd 3: sc in all 12 st (12)
- Rnd 4: (sc in next 3 st, inc in next st) repeat 3 times (15)
- Rnd 5 – 6: sc in all 15 st (15)
- Rnd 7: (sc in next 4 st, inc in next st) repeat 3 times (18)
- Rnd 8 – 11: sc in all 18 st (18)
- Rnd 12: (sc in next 5 st, inc in next st) repeat 3 times (21)
- Rnd 13 – 18: sc in all 21 st (21)
- Rnd 19: (sc in next 6 st, inc in next st) repeat 3 times (24)
- Rnd 20 – 29: sc in all 24 st (24)
- Rnd 30: (sc in next 7 st, inc in next st) repeat 3 times (27)
- Put stuffing in the tail and continue stuffing as you go.
- Rnd 31 – 42: sc in all 27 st (27)
- Rnd 43: (sc in next 8 st, inc in next st) repeat 3 times (30)
- Rnd 44 – 53: sc in all 30 st (30)
- Slst in next st. Fasten off, leaving a long tail for sewing.
- Sew the tail to the body between rounds 3-16 (photo 5&6).

Big spot 3x:
- Use orange yarn
- Rnd 1: start 6 sc in a magic ring (6)
- Rnd 2: inc in all 6 st (12)
- Rnd 3: (sc in next st, inc in next st) repeat 6 times (18)
- Rnd 4: (sc in next 2 st, inc in next st) repeat 6 times (24)
- Slst in next st. Fasten off, leaving a long tail for sewing.

Small Spot 5x:
- Use orange yarn
- Rnd 1: start 6 sc in a magic ring (6)
- Rnd 2: inc in all 6 st (12)
- Rnd 3: (sc in next st, inc in next st) repeat 6 times (18)
- Slst in next st. Fasten off, leaving a long tail for sewing.
Assembly:
- Sew a large spot to the body, between rounds 12-21. Use the left eye as a guide to position the spot.
- Sew a small spot to the body, between rounds 9-16. Use the right nostril as a guide to position the spot. (photo 5&6)
- Sew a large spot to the back of the body, below round 21, position the spot a bit over the tail.
- Sew a small spot to the tail, between rounds 9-14, position the spot near the bottom.
- Sew a small spot to the tail, between rounds 18-24, position the spot near the top.
- Sew a small spot to the tail, between rounds 28-33, position the spot in the middle.
- Sew a small spot to the tail, between rounds 37-42, position the spot near the top.
- Sew a large spot to the tail, between rounds 44-51, position the spot near the bottom
Now Simon the Snake is done, I hope you enjoyed crocheting this cute snake Amigurumi.
You can find many more stuffed animal patterns on my blog.
